Saturday, February 26, 2011

Pure Innocence Birthday

Hi,
Today I have a card which is a little different for me, but I really love the end result. I stumbled upon this absolutely gorgeous site here and fell in love with the sweet images. These illustrations remind me so much of books that I used to read as a child and I love their innocent whimsical style. I noticed that the designer often leaves the people black and white with a little shading and instantly I thought how much fun would it be to do this with my Pure Innocence stamps as they have such a cute whimsical style also. So here is my card:

I used some Kraft card for my base with Sweet Blush as my mat layer. I stamped my Pure Innocence - Basket of Eggs image on Vintage Cream cardstock in Memento ink and then used my C1 and C5 marker to add some shading on the girl and at her feet. I found a pretty flower stamp from AnnaBelle Stamps Backgrounds By Design 1 and stamped some flowers at her feet. I then stamped some more of the flowers and cut them out, covering up the eggs in the basket and layering them on the ground. A pop of colour was added by colouring the flowers in R81/R83 Copic Markers as well as the clip in her hair.

The Happy Birthday sentiment was stamped in Memento Ink and then I added some sweet blush butterflies with a paper pierced trail. To finish off the front (and its hard to see), I used my Clear Atyou Spica glitter pen to colour over the butterflies and flowers. On the inside of the card I stamped some more of the flowers, adding some cut flowers also. The sentiment was stamped in Memento Ink.

I really enjoyed creating this card and will be doing some more when I increase my Pure Innocence stamp collection! I'll be back with more in the next day or so and don't forget the Christmas Stampin' All Year Long challenges will be starting up this Friday 4th March so stay tuned!
Supplies
Stamps: Pure Innocence Basket of Eggs (MFT); Backgrounds By Design 1 (AnnaBelle Stamps);Inside & Out Birthday (PTI)
Cardstock: Vintage Cream, Kraft, Sweet Blush (PTI)
Ink: Tuxedo Black (Memento)
Accessories: Copic markers - C1,C5, R83,R85; Clear Atyou Spica glitter pen; paper piercer; Butterfly Punch (Martha Stewart)

Friday, February 25, 2011

AnnaBelle Stamps Bling Sketch Challenge ABSC035

Hi there!
Third time lucky - I have tried to post this card three times and have had all sorts of trouble for some reason, so after taking a couple of hours for the whole process, I won't be listing all the steps for this card as I'm tired!
This week its time for another AnnaBelle Stamps Sketch Challenge over at the AnnaBelle Stamps blog. Here it is:
absc035
This was a challenge for me as my ideas kept changing trying to get all the elements to work.

The image I used for this card is from Helen's Party which is such a fun set to play with. This card has taken me out of my comfort zone as I don't usually go for bright colours and it doesn't feel as clean as I would usually like, but its fun to try new things.


The inside also uses the sentiment and flower image from the same set. Be sure to check out the rest of the design team's blogs to see their cards:


To go into the draw to win a $20 gift voucher to spend at the AnnaBelle stamps store or have a chance to be a guest designer, you can see all the details over at the AnnaBelle Stamps blog. Looking forward to seeing your creations!

Back soon

Supplies
Stamps: Helen's Party (AnnaBelle Stamps)
Cardstock: Vintage Cream, Aqua Mist, Lemon Zest (PTI)
Ink: Tuxedo Black (Memento); Pumpkin Pie (SU)
Accessories: 3mm Pumpkin Sprinkles, Natural Cotton Twine (AnnaBelle Stamps); Hibiscus Burst ribbon (PTI); Apron Lace punch (Fiskars); Circle nestabilities (Spellbinders); Copics, Atyou Spica Clear glitter pen

Saturday, February 19, 2011

Curtain Call Colour Challenge {Act 69}

Hello,
After a really busy week while my husband is up in Cairns helping out with the recovery effort, I found it very relaxing each night to have some crafting time. I decided to participate in this week's Curtain Call Challenge:


Such gorgeous colours, but I have to admit that I found adding Real Red and Whisper White to the mix VERY challenging!! I adapted it by using white pearls and just a touch of Real Red as a mat to my main layer.
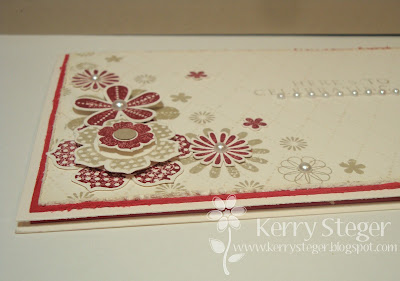
 I started out with a Very Vanilla base and then matted a second vanilla layer on Real Red card. I used my A Little Argyle set and Chai Tea Dye ink to stamp my background and then inked the edges with Chamomile ink and distressed them. I stamped an array of flowers from Beautiful Blooms II in Crumb Cake ink and then stamped smaller coordinating flower images in Cherry Cobbler layering them on top with white pearls. My sentiment from Inside And Out Birthday was stamped in Crumb Cake ink and a row of white pearls used to highlight it.

On the inside of the card I repeated the layers from the front, choosing to stamp my sentiment this time in Cherry Cobbler ink. I then stamped a small flower image in Crumb Cake randomly on the sentiment layer. I finished off the inside by stamping and cutting two flowers (I have to get the matching dies for these flowers as the cutting time for this card was HUGE!), and adhering them with a white pearl to continue the floral theme. Finally the edges were inked and distressed. Just click on the images to see more detail.

I have to say that I love the combo of Cherry Cobbler, Kraft and Vanilla! This will be a go-to combo heaps in the future!!

Enjoy your weekend - I am getting ready for the heatwave due to hit Brisbane on Sunday and Monday!

Bye!

Supplies
Stamps: Beautiful Blooms II, A Little Argyle, Inside and Out: Birthday (PTI)
Cardstock: Very Vanilla, Real Red, Crumb Cake (Kraft) (SU)
Ink: Crumb Cake, Cherry Cobbler (SU); Vintage Touch Tea Duo (PTI)
Accessories: Distressing Tool (Tim Holtz); White Pearls (Kaisercraft); Dimensionals (SU)

Friday, February 18, 2011

Say It In Yellow!!

Back again with another weekly challenge from AnnaBelle Stamps and this time the challenge is to create a card using yellow. I was very excited to create this week's card as yellow comes a close 2nd to my favourite colour -red.

This card uses a few different techniques such as heat embossing, dry embossing and paper piecing. The details of how I assembled it are as follows:

1. Cut top yellow layer and run this through Cuttlebug with embossing folder.
2. Lightly brush some white acrylic paint over the embossed flowers and around the edges of this layer. Then add dots of gllitter to the flower centres.
3. Cut out centre of yellow layer with circle nestability.
4. Stamp Lil Molly's Flowers image in centre of white layer. Colour with copics and paper piece clothes.
5. Use Palette Heat and Stick Glue pad and sponge dauber and gently dab around the stamped image. Sprinkle glitter over this and let dry.
6. Adhere diecut grass on top of Molly's shoes with tape.
7. Tie white ribbon around bottom of top layer and adhere yellow card to white card with foam dimensionals. Adhere these to yellow card base.

Inside
8. Run white cardstock through Cuttlebug with embossing folder. Add glitter to flower centres.
9. Use die cut yellow circle left over from the front of card and lightly sponge some white acrylic paint over flowers and add glitter to centres.
10.Stamp Happy Birthday sentiment from Jasmine's Cupcake  set in Versamark and heat emboss with white powder. Score two lines underneath sentiment and add ribbon.
11. Adhere circle and white cardstock to inside.

This set was lots of fun to work with as I just love the opportunity to colour or paper piece! I just wish I hadn't added the white sponged paint on to the centre circle inside as it is too hard to see the embossed sentiment.  Anyway, be sure to pop on over to the other design team blogs to see their wonderful cards:

Belles
Andrea
Sue W
Kylie
Chupa
Ida
Jerusha
Rene'
Lisa
Sue K


Bellas
Liz
Kerry


 And don't forget by entering the challenge and linking your creation to the AnnaBelle Stamps blog, you will be in the running for a $20 voucher to spend in the store.

See you soon!

Supplies
Stamps: Lil Molly With Flowers, Jasmine's Cupcake (AnnaBelle Stamps)
Cardstock: Lemon Zest, Stampers Select White (PTI); Thrift Shop (October Afternoon)
Ink: Versamark, Tuxedo Memento Black (Tsukineko)
Accessories: Sizzix Elegant Bouquet embossing folder, White Embossing Powder, Dazzling Diamonds glitter, sponge dauber (SU); Circle Nestabilities (Spellbinders); Grass die cut (MFT); Copic markers; white ribbon; ScorPal, white acrylic paint (Kaisercraft)

Sunday, February 13, 2011

Happy Valentine's Day!

Hi,
I have found the most beautiful colour combo over at the ColourQ Challenge 71 and I couldn't resist joining in!

The only colour I don't have is Blushing Bride so I used some pink cardstock that was the closest match. It also ties in well with Just Add Ink's Challenge 55 this week to add love to our cards.  Any excuse to go all sentimental and add some hearts is okay with me!!
Today I thought I would llist the steps on how I put the card together, rather than rambling on with all the details as there were quite a few steps involved:

1. Create base from Pretty In Pink cardstock and sponge edges with Pink Pirouhette ink.
2. Cut Kraft layer and stamp Damask image from Fancy Flourishes set in Versamark ink.  Layer Scor- tape along edges for a border and sprinkle Dazzling Diamonds glitter over this. Adhere this layer to white card layer.
3. Use Mat Stack 1 die to cut Pretty In Pink card and stamp tiny heart background from Background Basics Hearts and Versamark.  Sew a pink button on either side with Kraft coloured thread.
4. Use Cursive script from Background Basics Hearts and stamp on white adhesive sheet with Crumb Cake ink. Cut this with a  Spellbinders circle die. Cut a larger circle from Pink Pirouhette card and adhere these together. Run these through Xyron  and adhere to Mat Stack 1 base.
5. Use rock and roll technique to stamp Bliss butterfly Pink Pirouhette and Pretty In Pink ink. Cut this out and adhere to Mat Stack, bending up wings.
6. Stamp With Love sentiment from Yummy set in Crumb Cake ink and cut into a banner. Punch a Kraft heart and adhere these under butterfly.
7. Stamp argyle and heart pattern on Pink Pirouhette card and punch 3 hearts. Use darker card to punch 2 plain hearts. Adhere these to front, popping two up on dimensionals.
8. Add white ribbon to Kraft layer, looping over a couple of times and attach Mat stack image over the top. Attach all layers card base.

Inside of card
1. Layer white cardstock on Kraft card.  Stamp tiny heart background image from Background Basics hearts in Crumb Cake ink. Add a small Kraft strip, punch 2 pink hearts from Pink Pirouhette card and adhere to strip.
2. Stamp sentiment from Heartfelt Basics set in Crumb Cake ink and adhere all layers to inside of card.

Voila - finished!! This card started off quite simple but seemed to take on a life of its own, but I am very happy with the result.

Back soon!
Supplies
Stamps: Fancy Flourishes (Kaisercraft); Yummy - retired, Bliss - Saleabration (SU); Background Basics: Hearts, A Little Argyle, Heartfelt Basics (PTI)
Cardstock: Stampers Select White, White Adhesive Cardstock (PTI); Pink Pirouhette, Pretty In Pink, Kraft (SU); dark pink card
Ink: Versamark, Pretty In Pink, Pink Pirouhette, Crumb Cake (SU)
Accessories: Xyron; Scor-Tape; Dazzling Diamonds glitter, heart punch, dimensionals (SU); Sweet Blush buttons, Mat Stack 1 Die (PTI); Circle Nestabilities (Spellbinders); white ribbon; Kraft thread


Friday, February 11, 2011

Say It With Polka Dots

Hi there!!
Sorry for my extended absence - this week has been so busy with my son's birthday sleepover and then Wed night I took my two boys to see 'Wicked' and it was great!! I am a massive fan of musicals but was a bit sceptical about whether I would like this or not. But I was really surprised - the music was great and the special effects were amazing! Also I stay after work on Thursdays to learn Auslan - sign language and my brain feels like mush at the end of it. Its an amazing experience to learn this, but I now have the utmost admiration for those who are proficient at it - it is quite difficult. Hopefully I will feel more confident by the end of the term!

Now onto my card today -over on the AnnaBelle Stamps blog the challenge this week is Say It With Polka Dots. I had a lot of fun with this and decided to also enter it into Card Positioning Systems challenge 204 as the sketch seemed to match my idea for this card.
Here is my card:
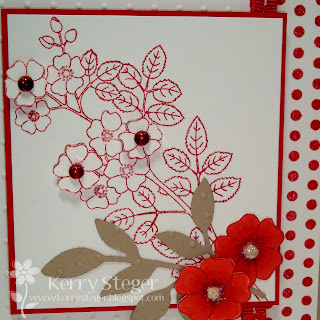
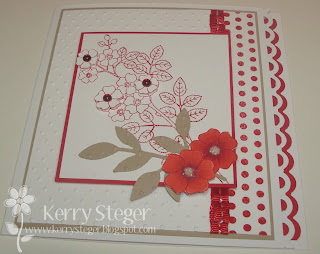
I went with one of my fave colour combos - Kraft, Red and White. I started off by adding a border to my card front with my Apron Lace punch. I matted my embossed/stamped polka dot layer on Kraft cardstock and then added this to my white base. The stamped polka dot section uses a stamp from the Backgrounds By Design 1 set and I used the Ballerina Rose set to stamp my main image in red ink. I then stamped it again and cut out three of the flowers and popped them up on dimensionals, adding some AnnaBelle Cherry Sprinkles to their centres. For my corner detail, I stamped the larger flower image from the Ballerina Rose set in Real Red ink a couple of times and coloured them with copics before cutting out and adding glitter to them. I also found a Sizzix die that matches this perfectly so I die cut my leaf image, embossed it with my Swiss Dots folder and layered it with my flowers in the corner. Some AnnaBelle Red stitched ribbon was gathered along the edge of the polka dots to finish the front off.
To complete the inside, I added one row of polka dots in red and then added my sentiment with Crumb Cake ink in the centre. I also added some red cardstock cut with my Apron Lace punch and positioned it so that when the card is closed, it layers in neatly beside my white Apron Lace border.
To see some other wonderful creations using Polka Dots,  have a look at the rest of the design team's cards:
Belles
Andrea
Sue W
Kylie
Chupa
Ida
Jerusha
Rene'
Lisa
Sue K

Bellas
Liz
Kerry
Don't forget that by posting your entry for this challenge on the AnnaBelle Stamps blog, you go in the draw to win a $20 voucher to spend at AnnaBelle Stamps.


Finally, speaking of stamps, its almost time for the Belles to begin previewing this month's new releases. Why not snag a blinkie for your blog - just copy and paste the code below:


I will be back on the weekend with more. Have a happy Friday!!


Supplies
Stamps: Backgrounds By Design 1, Ballerina Rose (AnnaBelle Stamps)
Cardstock: Stampers Select White (PTI); Kraft, Real Red (SU)
Ink: Crumb Cake, Real Red (SU)
Accessories: Cherry 3mm Sprinkles, red stitched ribbon(AnnaBelle Stamps); Dazzling Diamonds glitter, Sizzlit Little Leaves Die(SU); Apron Lace Punch (Fiskars); Swiss Dots Embossing Folder (Cuttlebug); Copic Markers

Friday, February 4, 2011

Blog Award and Exciting News

Happy Friday to you all!
My fellow AnnaBelle team member Sue very kindly left me a blog award over at her blog and I wanted to say a HUGE thankyou! Sue makes really beautiful cards and has a clean style that I just love. Thankyou Sue!

Now it is time for me to choose some designers who I think reallly deserve to be recognised for their talent.
This award is to showcase some of the not-so-well-known blogs.  We have some talented crafters out there and this is one way for you to find new and interesting blogs.  All I have to do is nominate three to five blogs I read and want others to get to know .

If I tag you and you want to participate,  create a post where you post the 'LOVE BLOG' image. You should also blog the persons link that gave you the award and inform her/him that you accept the award. You can then choose 3 - 5 favorite blogs which you also link in your post, then each blogger will inform you that they have been tagged.

Special Note from the Originator:
Dear bloggers:
The aim of this action is that we bring unknown, good blogs to light, so I would ask you not to blog fellow bloggers that already have 3,000 followers.
The three blogs that instantly came to mind for me were:

Amy : http://stamp-n-paradise.blogspot.com/
Amy has a beautiful clean and simple style that is very elegant and classy. Her photography of her cards is just amazing too - hopefully I will be able to take such great photos one day!!

Adele: http://adelefrancis.blogspot.com/
I have had the pleasure of seeing Adele's work IRL and she is so talented! The way Adele embellishes her cards is so pretty and her off the page projects are just amazing too!!!

Wendy: http://happystampingdesigns.blogspot.com/
I have been following Wendy's blog for a little while now and I really admire her use of colour and adding the extra finishing touches to her cards.

I hope that you will have a look at these 3 lovely blogs - their creations are very inspiring!!

On another, very exciting note, I have some news to share! I have been chosen to join the Christmas Stampin All Year Long (CSAYL) team!!!! I have been checking this blog out regularly for a couple of years and when the opportunity came up to join the team, I quickly applied!! Anyone that knows me well, knows that I am a big kid when it comes to Christmas - I get right into the Christmas spirit, play Christmas carols all the time (much to the annoyance of my husband!) and just love that time of year. So an excuse to make Christmas cards all year round is fantastic!!!! I am joining some very talented designers who you can see over in the right sidebar. Thanks MacKenzie again for this wonderful opportunity!

Say It In Pink, Blue and Chocolate

Hi there,
I am here today with a great colour challenge that Andrea has over at the AnnaBelle Stamps blog - Pink, Blue and Chocolate. What a great colour combo!!


I decided to keep my card quite clean and simple this time, starting with a Bashful Blue base, run through my Cuttlebug with my Linen Impression plate. I used the dotted border from the Backgrounds By Design 1 set from AnnaBelle Stamps to repeatedly stamp my blue dotted background and adhered some chocolate ribbon along the top. I then stamped my sentiment from the Ballerina Rose set and punched this out. matting it on some Chocolate Chip cardstock. I also stamped the flowers from the same set and coloured these in with my Copics, before cutting out and adding to the card. Some AnnaBelle Blossom Sprinkles were added to the flower centres to complete the front.

On the inside, I stamped another sentiment from the Ballerina Rose set and added some more flowers and sprinkles along the bottom on top of my dotted border strip. It was nice for a change to make a card that is more simple - I am really happy with the result.

Here are the links for the rest of the design team. Hop on over and have a look - they have some wonderful creations.

Belles

Bellas

By entering this challenge, you will be in the running to win a gift voucher to spend in the AnnaBelle Stamps store. To participate, hop on over to the AnnaBelle Stamps blog and link your creation. 

Have a great weekend!!

Supplies
Stamps: Backgrounds By Design 1, Ballerina Rose (AnnaBelle Stamps)
Cardstock: Bashful Blue, Chocolate Chip (SU); Stampers Select White (PTI)
Ink: Bashful Blue, Pretty In Pink (SU)
Accessories: Blossom Sprinkles (AnnaBelle Stamps); Chocolate Chip ribbon, Curly Label Punch (SU); Copics; corner rounder; Linen impression plate (PTI)

Thursday, February 3, 2011

Inkspirations Sketch Challenge #55

Hi there!
My eldest son Rohan is turning 10 on Saturday (sob, sob - all I hear from him is he is turning double figures and all I keep thinking is he's not my little baby anymore!). As he is getting to that age where I can no longer go down the cute road when making a card, I needed some inspiration so I turned to this week's Inkspirations Sketch Challenge #55 which is a fantastic one!! The options with this sketch are endless! Here it is:

I started with a white base and added a Kraft mat for the square grid. I found some Riding Hood Red and Baja Breeze designer paper and decided to add some yellow designer paper from October Afternoon's Thrift shop collection (love this paper!). I then cut my stars from chipboard and also punched out 5 stars from acetate to layer on top. Before adhering  the acetate, I used some White Staz On ink to stamp different patterns on each. I then added some glue dots behind the ink before positioning them on top of the chipboard stars.

To vary the grid, I used two Lemon Zest buttons tied with twine and cross stitched the other squares with the same twine.  The sentiment was stamped using Birthday Basics set from Papertrey Ink in Riding Hood Red ink and cut into a banner which I tucked in behind my main circle image after it had been popped up on foam adhesive.
On the inside, I carried the patterned paper theme, but cutting smaller squares from the same paper and layering my sentiment, also from the Birthday Basics set on top.

I think I just made the cut off for this week's challenge - my card was put on hold while I followed Cyclone Yasi - we have many friends in Cairns as we lived there up until 2 years ago and we were very concerned as some have properties on the Northern Beaches. We have heard today that they are all safe, although they did get battered with fierce winds, causing damage to a lot of the area around them and loss of power. Our thoughts are with those who were in the direct path of the Cyclone though who have suffered unimaginable damage to agriculture and properties. We were there in Cyclone Larry, which was a frightening experience, but the impact of Yasi is so much more devastating for these small towns. 

Supplies
Stamps: Birthday Basics, Around and About Sentiments (PTI)
Cardstock: Stampers Select White (PTI); Thrift Shop Collection (October Afternoon); Kraft, Riding Hood Red, Riding Hood Red designer paper, Baja Breeze designer paper (SU)
Ink: Riding Hood Red (SU); Cotton White Stazon (Tsukineko)
Accessories: Acetate; twine, dimensionals, Star Punch (SU);circle nestabilities (Spellbinders); Lemon Zest button (PTI); American Craft thickers