Showing posts with label Sewing. Show all posts

Sunday, May 1, 2011

Taylored Expressions Sketch Challenge #137

Hello,
Hope your weekend is going well - did you watch the Royal Wedding on Friday?? I went over to my mum's and we watched it and as usual I cried!! Weddings just always make me sentimental and I thought they made just the loveliest couple! Its nice to see a good news story for a change!

Today I have a card for the current Taylored Expressions Sketch over at the TE blog:
I am yet to build up my Taylored Expressions collection further - love their stamps, so I used my very trusty and well loved set - Wings Of Joy to create my card.
I used Very Vanilla for my card base and first stamped an Argyle pattern from A Little Argyle, then stamped a small snowflake image from Wings Of Joy in Crumb Cake ink randomly over the front, inking all of the edges with Chamomile ink. The sentiment was stamped in Old Olive ink, cut into a banner with the edges inked as well. For my three scalloped layers, I used Real Red cardstock, some Green Tea Leaves paper and Old Olive card and all were punched with my Upper Crest border punch. I then used my sewing machine to straight stich along the Olive strip.

The main image was stamped in Old Olive ink and I used my red glitter pen to colour in the heart and berries. I ran this through my Cuttlebug with an oval nestability and then die cut a scallop oval as a border. Finally this layer was adhered with dimensionals.
I used the same snowflake image to randomly stamp over the inside layer and added my sentiment with Old Olive ink. A layer Green Tea Leaves paper was added to finish the inside off.

Thanks for visiting!!


Supplies
Stamps: Wings Of Joy (TE); A Little Argyle (PTI)
Cardstock: Very Vanilla, Real Red, Old Olive (SU); Green Tea Leaves DP (PTI)
Ink: Old Olive, Crumb Cake (SU); Chamomile & Chai Tea Dye inks (PTI)
Accessories: Oval & Scalloped Oval Nestabilities (Spellbinder); Red Atyou Spica glitter pen; Dimensionals (SU)' Upper Crest border punch (Fiskars); cream thread

Friday, April 1, 2011

CSAYL Challenge - Inside/Outside

This week over at the CSAYL blog, the challenge is to create a card where both the inside and outside is decorated. The sponsor of this challenge is the wonderful Pink Cat Studio!
View PCS_Spons...jpg in slide show
The winner of this challenge will be able to select 5 free digis of their choice! Its very difficult to decide though as all their images are so CUTE!

Here is my card for this week's challenge:

For this card I used the super cute GingerBread Tree image. I coloured these with copics and added some sparkle which is hard to see here using my red Atyou Spica glitter pen. I then die cut my image with an oval nestability and added a scalloped oval which I diecut from Chocolate Chip cardstock. The background papers are from both Kaisercraft (sorry I can't remember the name of this pink paper) and Cosmo Cricket's DeLovely collection which is gorgeous! I used my Upper Crest border punch with some Hibiscus Burst cardstock and attached this over the join in both papers. After this layer was matted on white card, I used some linen thread to machine stitch a border and then added some Hawaiian Shores ribbon.  The sentiment is also from Pink Cat Studio and once this was added, all the layers were adhered to my Chocolate Chip base.
For the inside of the card, I printed another Pink Cat Studio sentiment and used Hibiscus Burst as my mat. I then cut out a row of Gingerbread men once coloured and adhered them along the bottom. Finally I sewed some Chocolate Chip cardstock to Hawaiian Shores ribbon and adhered this underneath.

I usually make a habit of decorating the inside of my cards as I just think it finishes the card off perfectly and continues the theme throughout.  Have a look at the CSAYL blog and see what the other designers have created this week and be sure to link your entry to be in the running to win this fantastic prize!

Supplies
Stamps: Gingerbread Tree,Merry Christmas From Our Tree To Yours sentiment, Seasons Greetings sentiment (PCS)
Cardstock: Stampers Select White, Hibiscus Burst (PTI); Chocolate Chip (SU); DeLovely DP (Cosmo Cricket); Miscellaneous Christmas paper (Kaisercraft)
Accessories: Copics; Red Atyou Spica Glitter Pen; Hawaiian Shores ribbon (PTI); Upper Crest border punch (Fiskars); linen thread; oval nestability, scalloped oval nestability (Spellbinders)

Sunday, March 20, 2011

Play Date Cafe Challenge #73

You might want to grab a cuppa to read this post - there is so much to share about this card! I am having a go at The Play Date Cafe's Challenge #73 which has the yummiest colour combo:

I would never think to use these colours together but they work so well. I have a new stamp set from Papertrey Ink that I have been itching to ink up - Bitty Baby Blessings, so I decided to use these colours to make a non-traditional baby card. Can I tell you that I had just about the most fun ever making this card - I love this stamp set and that liitle baby is tooooo cute!!!!

I will show you all the images (there are a few!!) and then list the steps on how I made it. You can cllick on the images to get a closer view.


Instructions
1. Make a square card base from Rose Red card. Use Apron Lace border punch to create a scallop border along the front.
2. Cut a square of white cardstock and use Scallop border punch to scallop the bottom edge. Paper pierce a cross stitch pattern along each scallop and then cross stitch with Kraft thread. Adhere this to the base.
3. Cut a smaller white square and stamp the pram image in Tuxedo Black ink and then add baby head peeking out of the hood.
4. Run this layer through Cuttlebug with Linen Impression Plate and then round the top right and bottom left corners.
5. Stamp the pram image again on Rose Red patterned paper (retired) and cut out the body of the pram. Pop this up on dimensionals on top of the original stamped image. Add clear spica glitter pen to baby's curl and the pram.
6. Adhere this white layer to some More Mustard DP - this is retired, but similar cardstock could be used.
7.  Die cut two cloud images, stamping one with 'Welcome baby' in Plum ink and running the other through the Cuttlebug with the Argyle Impression Plate. Use Quickie Glue Pen to apply a thin layer of glue around edges of clouds and dip in glitter. Adhere the argyle cloud to the white layer, and then pop up the sentiment cloud on dimensionals overlapping the other.
8. Tie some ribbon around the two layers, stitching a button to the bow centre.
9. Stamp the pram again onto some scrap white cardstock, colour the wheels grey with Copics, cut just the wheels out and then adhere to pram with dimensionals so they overlap the ribbon.

Inside
10. Mat some More Mustard DP on white cardstock and adhere both layers to inside of card.
11. Cut a square white layer and stamp ;Happy New Baby' in Plum Ink. Stamp the mini pram image in black ink on either side of sentiment and colour with Rose Red marker. Add some spots with white gel pen.
12. Run this layer through Cuttlebug with Argyle Impression Plate and round top right/bottom left corners.
13.. Pierce holes under sentiment and cross stitch with Kraft thread. Adhere this layer on to More Mustard layer in card.

Phew!! Finished! But boy did I have fun making it! I had that much fun that I decided to make another more traditional baby card:


Hope you liked the cards and I will be back this week with some more DT cards.

See ya!


Supplies
Card 1
Stamps: Bitty Baby Blessings (PTI)
Cardstock: Select White (PTI); Rose Red, More Mustard DP - retired, Rose Red DP - retired (SU)
Ink: Sweet Plum, Tuxedo Black (Memento)
Accessories: Cloud Die, Argyle Impression Plate, Linen Impression Plate, Lemon Zest button (PTI), Scallop border punch, Dazzling Diamonds glitter (SU); paper piercer; Kraft thread; white gel pen (Signo); corner rounder; lavender ribbon; copic markers, Atyou Spica clear glitter pen; Apron Lace border punch (Fiskars)

Card 2
Stamps: Bitty Baby Blessings (PTI)
Cardstock: Select White, Aqua Mist, Sweet Blush, Kraft (PTI); Delovely DP (Cosmo Cricket)
Ink: Baja Breeze (SU); Vintage Sepia (Versafine)
Accessories: Cloud Die, Argyle Impression Plate, Linen Impression Plate (PTI); Scallop border punch, Dazzling Diamonds glitter; Blushing Bride ribbon (SU); paper piercer; pink thread; corner rounder; copic markers - including blender pen for inside prams; Atyou Spica glitter pen,Apron Lace border punch (Fiskars)

Wednesday, January 19, 2011

Cute AnnaBelle Stamp

Hello,
Sorry for my absence of late - I have been caught up with so much this week and have just started back at work today - only 4 hours a day which is great as I still have time to stamp each night!! I went to post this card yesterday, but lost power for the evening due to storms in Brisbane so here it is today.

The card I am posting is one I have entered in two challenges: Just Add Ink Challenge 51 which is the theme of monochrome. My colours are all different tones of pink obviously. I also used Keesh's Inkspirations Sketch Challenge 53 which is here:


This is my first time using this really cute stamp - Lil' Michelle With Teddy from AnnaBelle Stamps - it is definately a stamp I will keep coming back to - heaps of fun to use and oh so gorgeous!!

I scored the white cardstock with my ScorPal in one inch intervals and then machine stitched around the edge before adhering to a Pretty In Pink base. I used some Cristina Re patterned paper for the vertical strip which I added to a Regal Rose mat. These were then stitched together also.  For the main image, I stamped the Lil Michelle image once in Memento Tuxedo Black ink and then again onto two scraps of designer paper which I used to paper piece the shirt and skirt. I then also stamped a second image of the teddy which I popped up on dimensionals once the rest of the image was coloured with my Copics.  To add a little sparkle I used my Clear AtYou Spica glitter pen to highlight the stockings, hair and skirt. Some Glossy Accents was added to the heart on her shirt to add dimension.

For the sentiment which is from the same set, I cut a tag from Cuttlebug's Tiny Tag set. I matted the image on some Pink Pirouhette card and then used my slot punch to make a small opening to feed my striped pink ribbon through. This ribbon is so pretty and really easy to work with. To finish off the pink theme, I added three blossom Sprinkles.

The inside of the card uses another sentiment  from the Lil' Michelle set which was matted on patterned paper and Regal Rose cardsock and machine stitched together.

I had a lot of fun colouring and making this card, and will be showing another card very soon which took me right out of my comfort zone. I will back in a couple of days with some exciting news!

Take care

Supplies
Stamps: Lil' Michelle with Teddy (AnnaBelle Stamps)
Cardstock: Stampers Select White (PTI); Pretty In Pink, Pink Pirouhette, Regal Rose (SU); Mia Collection paper (Cristina Re)
Ink: Memento Tuxedo Black; Strawberry Fool Hybrid (Elzybells - retired)
Accessories: Pink Striped ribbon, Blossom Sprinkles (AnnaBelle Stamps); Copic Markers; AtYou Clear Spica glitter pen; Tiny Tags die (Cuttlebug); Glossy Accents (Ranger); dimensionals (Stampin' Up); white thread

Saturday, January 8, 2011

Another Crochet card

Hi!
I am finally back with the last of my three crochet flower cards using the Sign Language set from Papertrey Ink.  Its so good to use up any scraps of designer paper as well and I had the Doodlebug Designs paper I used here, sitting in my stash for months so finally I could put it to good use!

The Lavender Moon and Sprinkles paper were layered on Kraft and machine stitched aroound the edges. A strip of Kraft with a scallop border was then added to cover the join between the two paper. I had it in mind that I wanted to layer four small images with a glitter border in between, so I planned this out by using some Scor-Tape to create the dividing border. I didn't expose the sticky side until I had stamped the four images where I wanted them to be positioned. I then peeled back the tape and poured some Dazzling Diamonds glitter on the sticky border. After that I added a second layer of each image which had been embossed and mounted on dimensionals. I then stamped the 'Just for You' sentiment repeatedly in Lavender Moon ink along the bottom of the white cardstock and matted this with a Kraft layer.

To attach the ribbon, I punched a slot  in the top of these layers,threaded the white ribbon through and then adhered the image layer to the designer paper.  I made a simple white bow and hand sewed my flower and button through  all of these layers to finish off before adhering it to my Kraft base.

The inside of the card continues the theme from the front with the image stamped in Lavender Moon ink using a sentiment from the Birthday Basics set and a tiny flourish added in Certainly Celery ink.

I have enjoyed making these little crochet flowers and will definately be keeping some on hand for future cards. I now need to move on to some other projects including some monogrammed letters for my kids' bedroom doors, not to mention the first card for this year's Christmas!!! Busy busy busy!! I have a lot of time to accomplish these tasks though, as my husband has taken my two youngest children to the Sunshine Coast for a few days to give my some crafting (and supposedly spring cleaning ..ha ha) time!! I am very lucky to have such a thoughtful hubby, but I don't know how much cleaning will be achieved!

I hope to be back soon with more projects to share,

Thanks for visiting 


Supplies
Stamps: Birthday Basics, Sign Language ( PTI); Simple Serif (SU)
Cardstock: Lavender Moon, White Basics (PTI); Sprinkles paper (Doodlebug Designs); Kraft (SU)
Ink: Lavender Moon (PTI); Certainly Celery, Baja Breeze (SU)
Accessories: Apron Lace punch (Fiskars); Scor Tape;dimensionals;white ribbon; pink button;white thread; crochet thread- cotton perle 842 (DMC); Dazzling Diamonds glitter, white embossing powder (SU)


Tuesday, January 4, 2011

Scallops and Bling

Back again,

I have been on a real roll and couldn't resist doing another card using my handmade flowers and some bling. Also, something I have been seeing a lot of lately is layers of scallops - I wasn't sure about them in the past, but now I am hooked! For this card again I used my trusty Sign Language set and some more Doodlebug Designs paper - this time Cherry Amour. I chose my colour scheme using the lovely colours in this paper and it all seemed to come together quite easily.

First, to my Kraft base, I added another layer of Kraft which was run through my Cuttlebug with Papertrey Ink's Linen Impression Plate. I then sewed a border around the edge. After I cut each scallop, I used my Scor Pal to add a slight bend to each one up a little. I layered my scallops from the bottom, starting with Certainly Celery, designer paper, Lavender Moon and some more Cherry Amour paper. This paper is so pretty!!!!! I popped up the lower Cherry paper on dimensionals - one under each scallop just to make sure that they had some pop.

I then added some Pretty In Pink ribbon and adhered this Kraft layer to my base with Scor Tape - just to make sure it would adhere well - I am a bit paranoid when it comes to adhering layers - I am always scared that the card could lift off, so I use way too much tape!!!

I stamped the images from Sign Language using Versamark and Real Red which I embossed and matted these on Certainly Celery card and Lavender Moon card and finally added some foam tape for extra dimension. I had some a strip of some tiny silver rhinestones in my stash so I added this above the ribbon. You can never have too much bling I say!! Finallly I adhered my three flowers with Glossy Accents and a coordinating rhinestone on each.

On the inside I used my Scallop border punch to create a border around all four edges. The sentiment is from the Heartfelt Basics set and was stamped in Certainly Celery ink and clear embossed so it is clearer.
I do have to apologise for the photo quality this time - I took this photo at night, so the colours weren't given justice here. This card was oh so much fun to make - very time consuming as I am not the world's quickest cardmaker as I am very critical, but I will definately be having a go at some more scallop layers in future. 

I aim to back in a couple of days with another card and want to keep my resolution to make Christmas cards starting now!

Thanks for visiting!

Supplies
Stamps: Sign Language, Heartfelt Basics (PTI)
Cardstock: Kraft, Certainly Celery (SU); White Basics, Lavender Moon (PTI); Cherry Amour designer paper (Doodlebug Designs)
Ink: Versamark, Real Red, Certainly Celery (SU)
Accessories: Linen impression plate (PTI); square punch, clear embossing powder, scallop border punch, Pretty In Pink ribbon (SU); square die (Cuttlebug); cream sewing thread; silver and pink rhinestones; green rhinestones (Kaisercraft); dimensionals, Scor-tape; Limeade floss (Bazzill); crochet thread- cotton perle 842 (DMC)

Sunday, January 2, 2011

ABSC033 Challenge


Happy New Year!!!!
I hope that everyone is having a great start to 2011 - I have a good feeling about this year! Now that the Christmas rush is over, I have time to get back into my stamping and build up my card collection which has been depleting a little over the last few months. I chose to enter this card into Annabelle Stamps challenge -    ABSC033. I loved this sketch - I have a thing for bling and I have been creating some little crocheted flowers to use on a card or two (the pattern for this is here). This is the sketch:

Here is my card:


I started with a Kraft base and them matted some Lavender Moon cardstock (embossed with my Swiss Dots folder) and some Doodlebug Designs Sprinkles paper onto another Kraft layer which was machine stitched and distressed a little. Some Certainly Celery ribbon was used to cover the join between the papers. The Signpost and image/sentiment were stamped using the Sign Language set from Papertrey Ink. I love this set as it can be used in so many different ways, mixing sentiments and images to suit any occasion. The signpost was stamped in Baja Breeze ink and the sentiment in Old Olive ink. The image was embossed using Certainly Celery ink and clear embossing powder and then popped up on dimensionals. Some tiny white pearls were added to the flowers. The white cardstock was then cut with a circle nestability and matted onto a Kraft circle. The two circles were raised up on foam adhesive. To finish off the bling, I used some white pearls and then added my two crochet flowers with some Glossy Accents.


The sentiment on the inside of the card is from Papertrey Ink's Birthday Basics set stamped in Old Olive ink. I used a tiny flower image from the Simple Serif alphabet set from Stampin' Up in Baja Breeze. A thin layer of the same designer paper was added along the bottom with a row of pearls above it. This layer was matted on some Lavender Moon cardstock.

I so enjoyed making this card that I thought I would go on to make a couple more cards using  a similar theme with crocheted flowers and the Sign Language set. Stay tuned as I have nearly finished the next one and will post it tomorrow.

See you then!


Supplies
Stamps: Sign Language, Birthday Basics (PTI)
Cardstock: White Basics, Lavender Moon (PTI); Kraft (SU); Sprinkles designer paper (Doodlebug Designs)
Ink: Baja Breeze, Old Olive, Certainly Celery, Versamark (SU)
Accessories: Swiss Dots embossing folder (Cuttlebug); circle nestabilities (Spellbinders);white pearls (Kaisercraft); clear embossing powder, Certainly Celery ribbon (SU); distressing tool (Tim Holtz); brads (Basic Gray); white thread; crochet thread- cotton perle 842 (DMC)

Friday, December 17, 2010

TCP Tuesday 139

Hello!

Today I have yet another non-Christmas card to share but one that I found quite challenging. My mum needed a birthday card for my nephew who is turning 13 tomorrow. I have to say that teenage boys are THE hardest male cards to make - I have no appropriate images and I just itch to add the bling and ribbons etc. Then I remembered that I had ordered October Afternoon's Thrift Shop paper pad and found this great black and cream paper which just screamed out to be used!! Everything for the rest of the card just seemed to flow naturally and I also found it very easy to incorporate into The Cat's Pajamas Tuesday Challenge 139:


I decided to make an easel card (tutorial  here) to add a bit of interest to quite a simple card. The first step was to make the base of the easel from Kraft cardstock. After this, I layered some black cardstock on the designer paper and used a Spellbinder circle die cut a circle through both layers. I then lightly adhered these layers to some Very Vanilla card and sewed a border around this using some Kraft coloured thread.

I then diecut a smaller circle from the patterned paper and a smaller circle from Kraft card and finished off with the number 13 using some American Craft thickers. I only had white, so I used a black marker to colour them. The circles were then popped up on some dimensionals and added to the front of the card. To finish off the front, I added some cream twill tape and adhered this inside the circle opening with Scor-tape.

On the inside of the card, I diecut another patterned paper circle and a smaller vaniila circle. I stamped the Happy Birthday sentiment in Versafine Vintage Sepia ink using the Birthday Basics set from Papertrey Ink. The circles were then adhered to the centre of some Very Vanilla cardstock on dimensionals to ensure that the front of the card is held in place when opened up. Voila! Such a simple card, but I am really happy with the outcome and will definately follow this sketch again. The card does look much better IRL - it was hard to capture it properly on camera.

I have to go now and finish watching the Santa Clause 3 with my kids tonight. Even though things are slowing down there out in blogland, I can't stay away from my craft room for long or I miss it like crazy, so I will hopefully have a Christmas card to share with a new stamp I am itching to ink up and also some 3D projects that are Christmas gifts (yes I have left it till the last minute!!!)

Thanks for visiting!


Supplies
Stamps: Birthday Basics (PTI)
Cardstock: Very Vanilla, Kraft (SU); Thrift Shop Designer Paper (October Afternoon);Black cardstock
Ink: Vintage Sepia (Versafine)
Accessories: Circle Nestablities (Spellbinders); Scor-tape; Kraft thread; Twill ribbon (SU)

Tuesday, December 14, 2010

Wedding Card - Sweet Sunday Sketch #96

Wow! Two posts in one day - I am on a roll! A friend of mine has asked me to make her a cute wedding card for a girl at her work and I had to think and think about what image I could use as I don't have many wedding stamps. Then I remembered that I had seen so many cute images at DigiStamp Boutique and I found the perfect 'cute' stamp for my card. I really enjoyed making this card as I was able to add lots of detail to it, while still coming up with quite a simple card.

For this card, I chose to use Karen Giron's Sweet Sunday Sketch Challenge #96 as my inspiration which I decided to flip:


I started by using some white basics cardstock and adding a scalloped edge to the front base. I then used my Guidelines Two background set to stamp a strip of patterned paper on some Papertrey Ink Guidelines Gridsheet cardstock with Certainly Celery and Pretty In Pink ink. The beauty of this paper is that you can't go wrong when positioning your images as its all lined up for you. This strip was matted on some Certainly Celery cardstock which has been cross stitched across the top with white DMC thread, the bottom punched with a scallop border punch and some glitter added with Scor-Tape. I then adhered some pink ribbon and thread it through a diamante buckle.

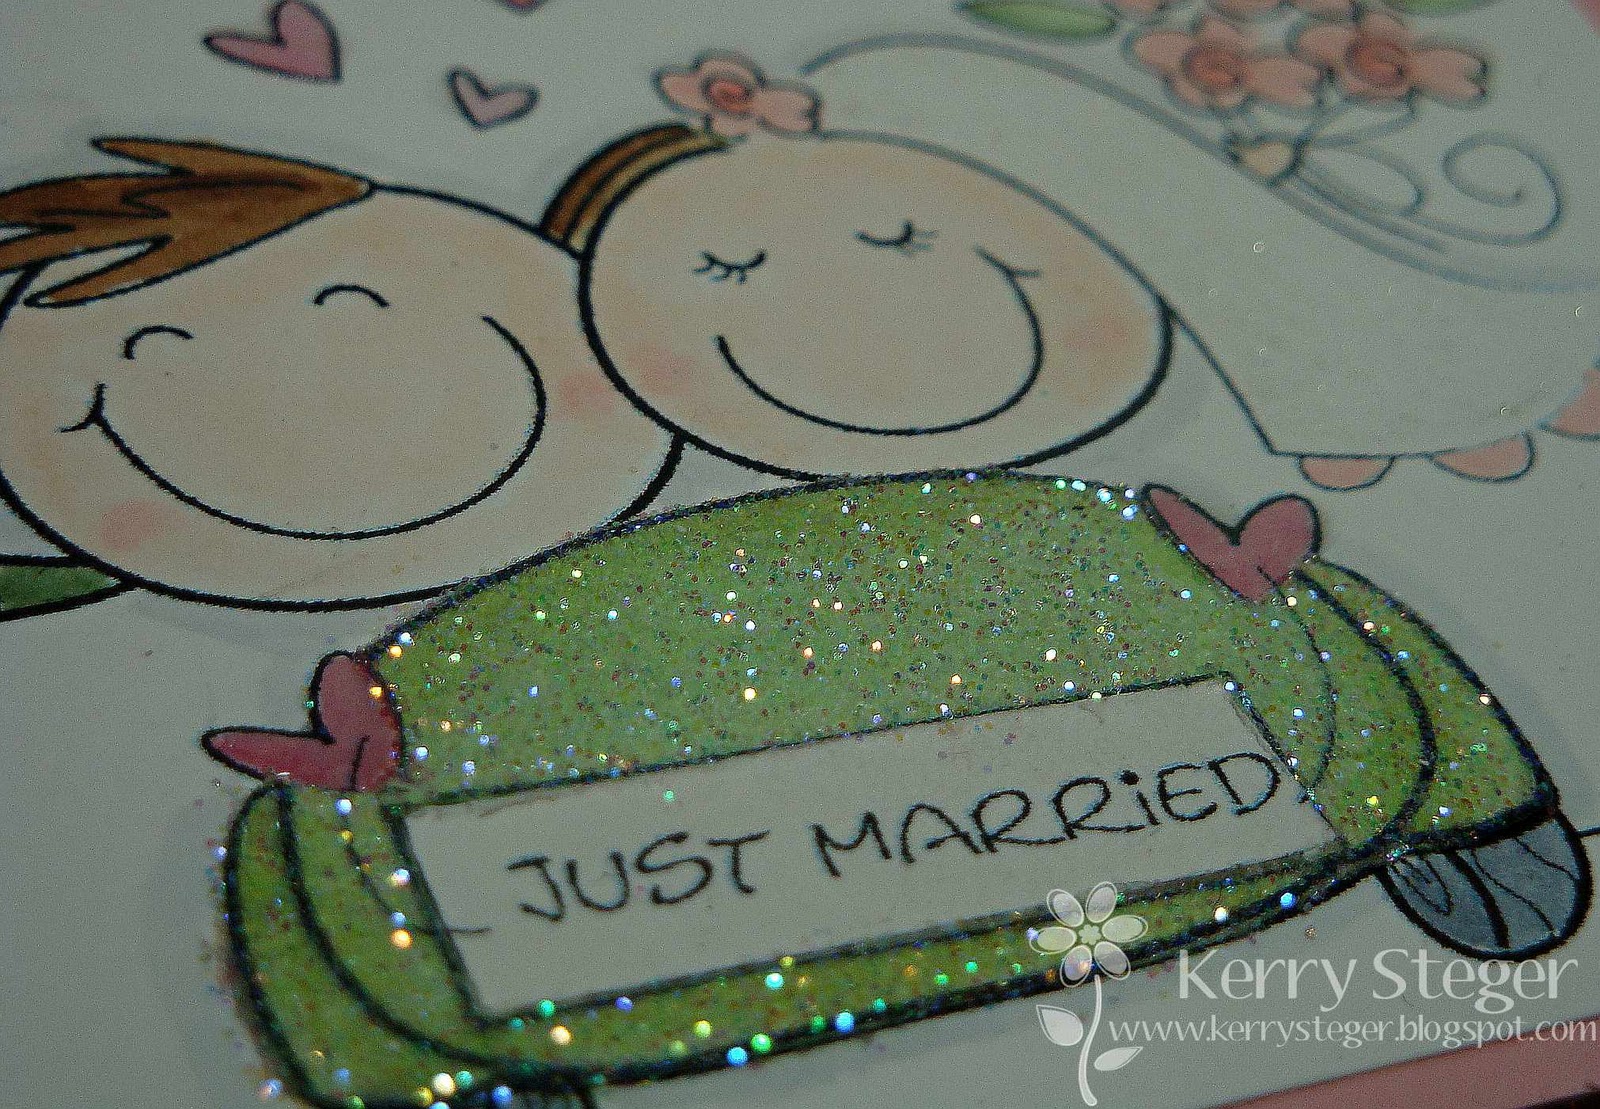
The image that I used for the card is Henry and Zoe Get Wed digital stamp from DigiStamp Boutique. I coloured the image with my Copic markers and then printed out a second copy of the image, cutting out the car. Once the car was cut out, I used my Craft Knife to remove the sentiment number plate. I coloured the remainder of the second car piece with my Copic markers and then ran the image through my Xyron and sprinkled it with glitter. I then adhered this second car image to the original coloured image and inserted the sentiment back  in with adhesive.


I coloured in the veil with my Copic Clear Atyou pen to add some sparkle. The hearts were coated with glossy accents to add some dimension. The image was then adhered to some Pretty In Pink cardstock and added to the front with dimensionals. To view the details clearer, just click on the images.

The inside of the card consists of some white basics cardstock adhered to a Certainly Celery mat. The sentiment was stamped in Memento Tuxedo Black ink with Papertrey Ink's Heartfelt Basics set. I find this set really flexible as you can choose certain words you wish to insert in the sentiment to suit the occasion and in this case I inserted 'happiness' and 'always'. To finish off the inside I added a small row of tiny silver rhinestones.

Sorry about the long winded post but I had so much fun making this card and I wanted to explain how I put it all together. I will definately be CASEing this card again myself in the future.

I have decided to devote tomorrow to the kids with no stamping time until tomorrow night (I am having withdrawals thinking about it!!). I have promised them a morning at the shops and then we are spending tomorrow afternoon playing board games and having some real family time. I will be back in a couple of days though as I have to create two birthday cards for my nephew and also finish my dear friend's daughter's 18th birthday card.

Have a good week!! 11 sleeps to go!!!!


Supplies
Stamps: Henry and Zoe Get Wed (Digistamp Boutique); Heartfelt Basics, Guidelines Two (PTI)
Cardstock: White Basics, Guidelines Gridsheets (PTI); Certainly Celery, Pretty In Pink (SU)
Ink: Certainly Celery, Pretty In Pink (SU); Memento Tuxedo Black
Accessories: Dazzling Diamonds glitter, Scallop Border Punch, Dimensionals (SU); Apron Lace Punch (Fiskars); Silver Rhinestones;DMC white thread; Paper Piercer; Pink Ribbon; Xyron Sticker Machine; Scor-Tape; Clear Copic glitter pen; Copic Markers; Glossy Accents, Silver Buckle