Showing posts with label Pink Cat Studio. Show all posts

Friday, October 7, 2011

CSAYL - Purple

Hi there!!
I can't believe its Friday already!! Time for this week's CSAYL challenge and this time its to use purple somewhere on your creation! It could be cardstock, ink, bling, buttons etc as long as its somewhere on your card. The sponsor of this week's challenge is Pink Cat Studio:

View PCS_Spons...jpg in slide show 

Here is some cool news about Pink Cat Studio. They have just launched a new program available for customers to use - Digi Stamp Designer. You just have to check it out! You can use this program to create and buy your own personalised digital stamps using Pink Cat Studio characters and accessories! I got to use the program this week and had soooo much fun! I created my own stamp for this week's challenge:


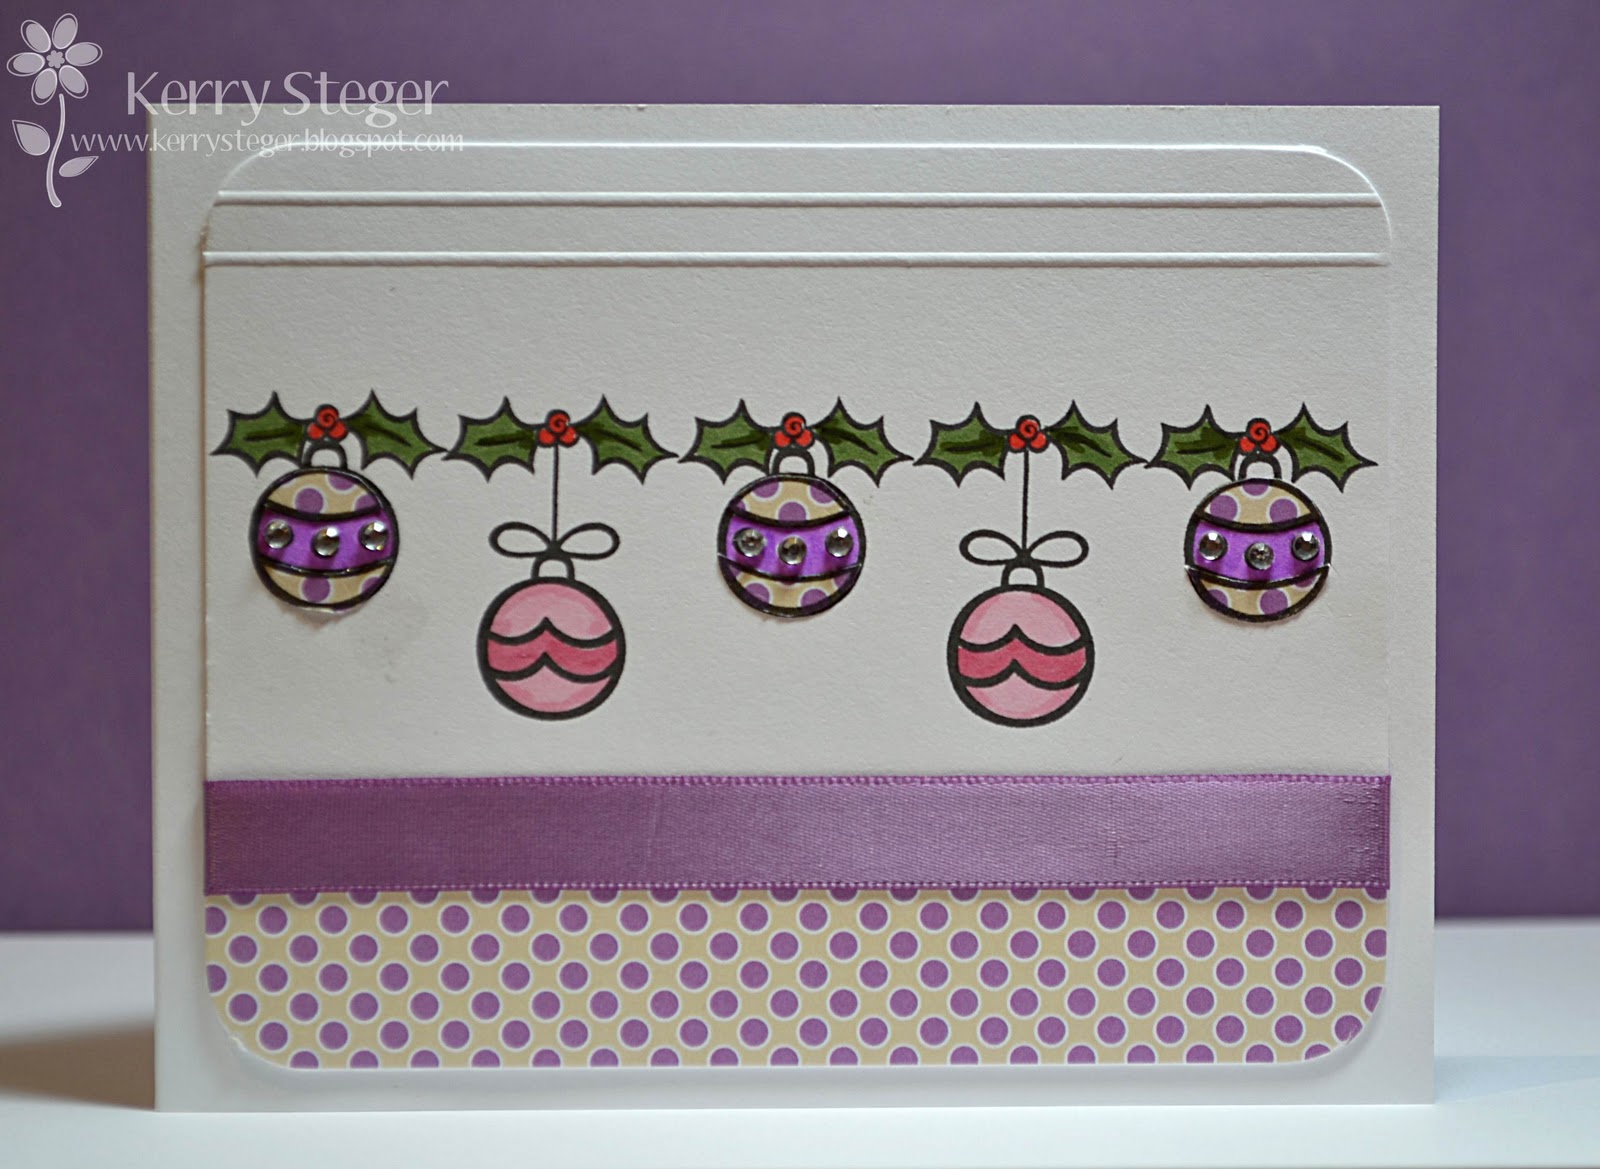
I combined a holly image repeatedly with some Christmas baubles. I paper pieced three of the baubles with some Sugar Plum Paper and coloured the rest of the image with Copics. Some silver rhinestones were added for some bling. I added another strip of paper along the bottom of my main layer and then rounded all corners. I used my Scor Pal to score two lines across the top of my panel and adhered some Plum Pudding ribbon above my paper. This was then all mounted on my card base.


On the inside I added another strip of Sugar Plum paper along the bottom and rounded all corners again. I stamped the sentiment from Stampin Up's Snow Swirled set in Plum Pudding ink.

You have a week to link up your creation dover at CSAYL to be in the running for this week's prize - 5 free digis from Pink Cat Studio. Good luck!!


Supplies
Stamps: Personalised stamp - Digi Designer (PCS); Snow Swirled (SU)
Cardstock: Stampers Select White, Sugar Plum DP (PTI)
Ink: Plum Pudding (PTI)
Accessories: Plum Pudding ribbon (PTI); silver rhinestones (Kaisercraft); Copics; corner rounder; Scor-Pal

Friday, July 1, 2011

CSAYL Challenge - She's Krafty!

This week at CSAYL, the challenge is to work with one of my all time fave colours - Kraft!! All you have to do is use Kraft cardstock somewhere on your creation this week! The sponsor of this week's challenge is Pink Cat Studio with the winner receiving 5 digis of their choice:

Download PCS_Spons...jpg (53.1 KB)

I used the Reindeer Ride digi for my card this week which is just the cutest stamp ever!!!


These are steps on how I created my card:
1. Fold Riding Hood Red cardstock in half and score.
2. Stamp background on bottom half of Kraft cardstock which has two top corners rounded, in Versamark and Cherry Cobbler ink and heat emboss with clear powder.
3. Adhere silver rhinestones to centres of some of the diamond images and also attach a row of rhinestones just above the top of the background.
4. Tie ribbon above the rhinestone strip into a bow.
5. Adhere Kraft layer to red base.
6. Print out Reindeer Ride image onto Vanilla cardstock and colour with Copics. Print image again onto Kraft cardstock and cut out the reindeer, paper piecing him onto the coloured layer. Colour reindeer's nose with red Atyou Spica glitter pen.
7. Apply some rubon snowflakes around the image and adhere on a red mat.
8. Use a two way glue pen to add a layer of gllue at the reindeer's feet and sprinkle on glitter.
9. Mount the image onto front of cardstock with foam mounting tape.
10. Apply Jingle Bells rubon onto vanilla cardstock and cut into a banner. Adhere this to front of card, using mounting tape in centre and glue dots close to end. Curl up ends of banner with a pencil.

On the inside, I simply adhered another layer of vanilla cardstock and stamped my diamond background pattern in Cherry Cobbler Ink. I applied another rubon sentiment and snowflake to finish it off.

Make sure you check out the CSAYL blog to see all the wonderful creations and link up your card for your chance to win this week's wonderful prize!!!

Supplies
Stamps: Reindeer Ride digi (PCS); Background Basics: Botanicals (PTI)
Cardstock: Riding Hood Red, Crumb Cake, Very Vanilla (SU)
Ink: Cherry Cobbler (SU); Versamark
Accessories: Very Vanilla ribbon, clear embossing powder; Dazzling Diamonds glitter (SU); Holiday Accent rub-ons(K & Company); silver rhinestones; foam mounting tape; Copic markers; red Atyou Spica glitter pen; corner rounder

Friday, June 3, 2011

CSAYL - A Little Something From Me To You...

Hi!
Its Friday, so its time for this week's CSAYL challenge - A Little Something From Me To You - create a gift card holder. The sponsor for this week's challenge is Pink Cat Studio and the winner will be able to choose 5 free digi stamps!
View PCS_Spons...jpg in slide show

I have never attempted a gift card holder, so I used a combination of ideas I have found on the internet to make mine. I used the Pink Cat Studio image Candy Bird Trio and printed this out onto some white cardstock cut 11" by 4 1/2 ".


I scored my cardstock lengthways at 4" and 8" leaving a 3" flap where the image was printed. I used my scallop border punch to edge the top of the flap and after colouring with Copics, stamped my sentiment in Real Red ink.


I used my slot punch to repeatedly cut a slot large enough to fit the longest side of a gift card on the other end of the cardstock. Following this, I stamped my inside sentiment on another layer of white cardstock and adhered it to the centre panel.


I finished off the back of my holder by adhering some Kaisercraft Christmas Carnival paper. On the section with the slot, I made sure I only adhered the paper on the outside edges so that the card can easily feed into the card holder.

Now make sure you have a go at the challenge over at the CSAYL blog and link up your creation for your chance to win this fantastic prize from Pink Cat Studio!  Our designers have made some lovely creations and this week's guest designer is Lori - her cards are amazing!!


Supplies
Stamps: Candy Bird Trio (Pink Cat Studio); Holiday Button Bits (PTI)
Cardstock: Select White (PTI); Christmas Carnival (Kaisercraft)
Ink: Real Red (SU)
Accessories: Copics; Scallop border punch, Slot punch (SU); blue ribbon

Friday, May 6, 2011

CSAYL- Make Us Laugh!


Over at the CSAYL blog, the challenge this week is to add a funny sentiment to your Christmas card and the sponsor this week is Pink Cat Studio:

View PCS_Spons...jpg in slide show
and the winner this week will receive 5 free digis of their choice. I chose to use Polar Bear Present for my card:

There was lots of sewing involved in this card to adhere all the layers together. I first started with my white base and then Kraft for my mat layer. On top of this I added two different strips of designer paper and some Pretty In Pink cardstock which was all machine stitched together. Before adhering my layers to the base, I tied some lace around the centre and added a Sweet Blush button to the bow with some pink striped baker's twine.

I printed the image and a free Pink Cat Studio sentiment onto some white cardstock and coloured in the hat and lightly inside the polar bear with copics (I used B0000 to add a little highlight inside the bear, so click the image to see this clearer). To add a little texture I added some sparkly fluff to the hat and pompom. Some silver rhinestones were added to finish it off.


On the inside I used a sentiment from Papertrey Ink's Holiday Button Bits set and then machine stitched the white layer to some more designer paper.

The girls on the design team have some lovely creations for this challenge, so be sure to have a look over at the  CSAYL blog and why not have a go at the challenge while you're there - its a great way to get ready for Christmas (and it will be here before we know it!

Supplies
Stamps: Polar Bear Present digi, sentiment digi (Pink Cat Studio); Holiday Button Bits (PTI)
Cardstock: Stampers Select White, Kraft (PTI); christmas DP - unknown (Kaisercraft)
Ink: Tuxedo Black (Memento)
Accessories: copics; sparkly fluff; silver rhinestones, lace (Kaisercraft); pink striped bakers twine (MFT); sweet blush button (PTI); thread

Friday, April 1, 2011

CSAYL Challenge - Inside/Outside

This week over at the CSAYL blog, the challenge is to create a card where both the inside and outside is decorated. The sponsor of this challenge is the wonderful Pink Cat Studio!
View PCS_Spons...jpg in slide show
The winner of this challenge will be able to select 5 free digis of their choice! Its very difficult to decide though as all their images are so CUTE!

Here is my card for this week's challenge:

For this card I used the super cute GingerBread Tree image. I coloured these with copics and added some sparkle which is hard to see here using my red Atyou Spica glitter pen. I then die cut my image with an oval nestability and added a scalloped oval which I diecut from Chocolate Chip cardstock. The background papers are from both Kaisercraft (sorry I can't remember the name of this pink paper) and Cosmo Cricket's DeLovely collection which is gorgeous! I used my Upper Crest border punch with some Hibiscus Burst cardstock and attached this over the join in both papers. After this layer was matted on white card, I used some linen thread to machine stitch a border and then added some Hawaiian Shores ribbon.  The sentiment is also from Pink Cat Studio and once this was added, all the layers were adhered to my Chocolate Chip base.
For the inside of the card, I printed another Pink Cat Studio sentiment and used Hibiscus Burst as my mat. I then cut out a row of Gingerbread men once coloured and adhered them along the bottom. Finally I sewed some Chocolate Chip cardstock to Hawaiian Shores ribbon and adhered this underneath.

I usually make a habit of decorating the inside of my cards as I just think it finishes the card off perfectly and continues the theme throughout.  Have a look at the CSAYL blog and see what the other designers have created this week and be sure to link your entry to be in the running to win this fantastic prize!

Supplies
Stamps: Gingerbread Tree,Merry Christmas From Our Tree To Yours sentiment, Seasons Greetings sentiment (PCS)
Cardstock: Stampers Select White, Hibiscus Burst (PTI); Chocolate Chip (SU); DeLovely DP (Cosmo Cricket); Miscellaneous Christmas paper (Kaisercraft)
Accessories: Copics; Red Atyou Spica Glitter Pen; Hawaiian Shores ribbon (PTI); Upper Crest border punch (Fiskars); linen thread; oval nestability, scalloped oval nestability (Spellbinders)

Friday, March 4, 2011

CSAYL - Bring On The Bling! Pink Cat Studio Sponsor

Hi there,
Well I am very excited about this post as its my first contribution as a DT member for Christmas Stampin' All Year Long (CSAYL)! The challenges will be posted at the stroke of midnight on Fridays and will run for a week each time.
What better way to start than with a fantastic sponsor - Pink Cat Studio!
View PCS_Spons...jpg in slide show
I have a number of their images - both digi and rubber and I love them all!!!! The prize for this week's challenge is 5 free digi images of your choice! And the challenge??? 'Bring on the Bling' - use as much bling as your little heart desires!

For this card I used the Lily Elf Carrying Tree image which was heaps of fun to work with. There were a lot of steps involved in making this card so I will list them below.


These are the steps:
1. Create card base from Aqua Mist cardstock.
2. Layer reverse side of  My Mind's Eye Jolly Snowmen paper onto white mat.
3. Print out digi image on white cardstock and colour with Copic markers. Stamp the image again to create a mask and cut out.
4.Die cut a small and large cloud image and place randomly on white cardstock as a mask and sponge on blue ink for sky. Repeat this around Lily, using the Lily mask. Cover the top two thirds of the white cardstock this way.
5. Using circle nestablility and white felt, die cut 2 circles and cut them both in two, off centre.  Attach Scor-tape to the rounded edges and sprinkle glitter. Attach the die cut circles along bottom of white cardstock, overlapping sllightly.
6. Punch out small snowflakes and randomly adhere under clouds with small silver rhinestones in the centre.
7. Colour over Lily's hat and tree baubles with Atyou Spica clear gllitter pen.
8. Stamp sentiment in Baja Breeze ink on Aqua Mist cardstock and cut to form a banner. Using some green thread, attach to layers with single stitch at each end to secure. Adhere all layers to card base.

Inside
9.  Randomly stamp small snowflake image in Baja Breeze ink (stamped off once to lighten a little) on white cardstock. Adhere a strip of My Mind's Eye reversed Jolly Snowmen paper. 
10. Die cut a large cloud from Aqua Mist cardstock and stamp sentiment in Baja Breeze ink. Adhere to white layer and attach to inside of card.

Phew!! I had the idea for this card in my head for days, but bringing it to fruition proved to be more challenging than I first thought. Anyway I am happy with how it turned out.

To participate in the challenge: 
  • Create a NEW project according to the challenge, post on your blog and link back to the challenge post at CSAYL.
  • Add your entry to the CSAYL challenge post with a direct link to your project post
  • Stop by at least 2 other challenge entries and leave them some love.
  • Be sure to check out the rest of the DT's cards! I can't wait to see what everyone creates!


    Supplies
    Stamps: Lily Elf Carrying Tree digi image (Pink Cat Studio); Holiday Button Bits (PTI); Wings of Joy (TE)
    Cardstock: Aqua Mist, Stampers Select White (PTI); Jolly Snowmen designer paper (My Mind's Eye)
    Ink: Baja Breeze (SU) Sea Lavender (Martha Stewart)
    Accessories: Dazzling Diamonds glitter, sponge dauber (SU); white felt, cloud dies (PTI); small snowflake punch; green thread; Copic Markers; Atyou Spica clear glitter pen; Scor-tape
The challenges will close on Thursdays at midnight (PST).

Thursday, November 25, 2010

12 Year Old Birthday

Hi there!

This is the first of my card orders that has been created for a friend. For this card I used Taylor's Sketch Challenge TESC 134:
She requested a card for a 12 year old girl who is very girly but has a love of chickens! Although this sounded challenging  I was determined to find a stamp that would be suitable and found this Pink Cat Studio Digi Stamp - Birds Make a Giant Cupcake which is totally adorable.

I started with a Vintage Cream base and layered some pink cardstock I had in my stash. This side layer uses some green cardstock with My Mind's Eye Quite Contrary paper (my favourite paper at the moment). The next layer uses Vintage Cream cardstock as the mat with the reverse side of the Quite Contrary paper . Some pearls were added to the side and some Hibiscus Burst ribbon attached. I used my Tiny Tags Cuttlebug die to create the tag and stamped the flowers and numbers in Old Olive Ink and Pretty In Pink Ink using my Simple Serif Alphabet stamps from Stampin' Up. This was attached to the ribbon with a jump ring.

The main image uses the Pink Cat Studio digi stamp - Birds Make A Giant Cupcake and this was coloured in with my Copics. This final layer was then cut and embossed using my circle nestablities and mounted on dimensionals.

The inside of the card has a layer of pink cardstock and then Vintage Cream. The sentiment is from Papertrey Ink's Heartfelt Basics  stamp set and also uses the flower image from the Simple Serif set from Stampin Up. The flowers were scattered randomly to underline the sentiment.

Another really fun card to make - oh how I love colouring with Copics!! Very addictive! I will be back on the weekend with more.

Take care,


Supplies
Stamps: Birds Make a Giant Cupcake - digi image(PCS); Simple Serif (SU); Heartfelt Basics (PTI)
Cardstock: Vintage Cream (PTI); My Minds Eye - Quite Contrary Designer Paper; Miscellaneous Green and Pink card
Ink: Pretty In Pink, Old Olive (SU)
Miscellaneous: copic markers; corner rounder; Circle Nestablities (Spellbinders); Tiny Tags (Cuttlebug); Hibiscus Burst ribbon (PTI); Pearls (Kaisercraft); jump ring

Wednesday, October 6, 2010

Snowflake Fairy Lily

I have another card to post today - getting ready for Christmas. This card uses the Snowflake Fairy Lily stamp from Pink Cat Studio. I had a lot of fun creating this card, colouring in the image with Copics which I love to do. The card also features some machine stitching which I think adds detail and texture to quite a simple card. I apologise for the photo - it was taken outside when the lighting wasn't at its best.


I am also in the process of trying to customise my blog further so there will be some changes in its appearance over the next few days. I am a bit of a perfectionist so you may see subtle changes along the way.

Thanks for visiting,

Supplies
Stamp: Snowflake Fairy Lily (PCS)
Ink: Tuxedo Black Memento
Cardstock/Paper: Kraft (SU), Kaisercraft 6x6 pad ChristmasCarnival, Stampers Select White (PI)
Miscellaneous: Copic Markers, 3D Stickers, white thread, Dazzling Diamonds glitter (SU), White Pearl (Kaisercraft),Apron Lace Punch (Fiskars)