Thursday, February 16, 2012

Colour Create Challenge #90


Hi, 
It's time for this fortnight's new Colour Create Challenge and again I was stuck with the colour combo - lilac, blue, kraft and white chosen by the lovely Sabrina:

16 February - Challenge 90 - Sabrina  -   Lilac, Blue, Kraft, & White

The optional extra is to add a handmade paper charm. Once I decided to keep my card nice and simple, the colours just seemed to work:


For this card I used a new digi stamp - Wryn Blooms from Tiddly Inks. I have admired these images for a while now, so couldn't resist buying one and will definately be getting more! I first created my sentiment on the computer and added my image before printing it out. I coloured her with Copics and tied some baker's twine around the bottom of my white and kraft layers. I created my handmade charm using a flower from Beautiful Blooms II stamped in plum ink and hand cut it. I pierced a hole attached it with a jump ring to my bow. Finally I added some silver rhinestones to all my flowers.


On the inside I created another computer generated sentiment and stamped the same flower image from Beautiful Blooms II in plum and Baja Breeze ink. This was  matted on some more Kraft cardstock.

The girls on the team have come up with some lovely creations so be sure to take a look over at Colour Create and enter your card while  you're there!


Supplies
Stamps: Wryn Blooms (Tiddly Inks); Beautiful Blooms II(PTI)
Cardstock: Stampers Select White, Kraft (PTI)
Ink: Baja Breeze (SU); Sweet Plum (Memento)
Accessories: silver rhinestones (Kaisercraft); Copic markers; jump ring; chocolate bakers twine (MFT)

Thursday, February 2, 2012

Colour Create #89 - White, Light Brown and Dark Brown


Hi,
Back again with Colour Create's Challenge #89. Shanna has challenged us to use the colours white or cream, light brown and dark brown with the optional extra challenge of adding hearts to your creation. Here is her inspiration pic:

2 February - Challenge 89 - Shanna White or Cream, Light Brown, Dark Brown


I originally felt very challenged by these colours but then when I received my new Houndstooth background stamp from Hero Arts I knew exactly how to use them.


I used white for my card base and then cut another smaller white layer which I stamped with my Houndstooth stamp in Early Espresso ink.  I then decided to try out a new technique which I found over on Gayatri's blog here. She inspired me to create my own heart embossing plate. I punched out some small hearts from some shrink plastic and then adhered them on to some cardstock with double sided tape in a neat pattern. This then became my embossing plate and I ran it through my Cuttlebug with a small piece of white cardstock which is shown layered on top of my houndstooth layer. I punched out some more hearts from Kraft cardstock which I coated in Glossy Accents and then added to the bottom of my white layer. A very thin strip of Chocolate Chip cardstock was added above the hearts and then I used two separate sentiments from two stamp sets to create my sentiment on this card. I used Wishing You from Heartfelt Basics and Love from Daily Design Sentiments. These were stamped in Early Espresso ink. Finally I added a small strip of white pearls underneath my sentiment to finish it off.


On the inside of my card I stamped another combination of sentiments from Heartfelt Basics in Early Espresso ink.I layered another strip of stamped Houndstooth background along the bottom with a Chocolate Chip strip above. Two more Kraft hearts finished with Glossy Accents were added along this strip.

I had lots of fun experimenting with new techniques on this card and did I mention how much I LOVE that Houndstooth stamp?? Its fantastic and I will be using this one a lot!! Now make sure you hop over to the Colour Create blog to enter this fortnight's challenge and check out the girls' cards - they're gorgeous!!


Supplies
Stamps: Heartfelt Basics, Daily Design Sentiments (PTI); Houndstooth background (Hero Arts)
Cardstock: Stampers Select White, Kraft (PTI); Chocolate Chip (SU)
Ink: Early Espresso (SU)
Accessories: white pearls (Kaisercraft); Glossy Accents (Ranger); heart punch (SU); shrink plastic

Thursday, January 26, 2012

Deconstructed Sketch #35


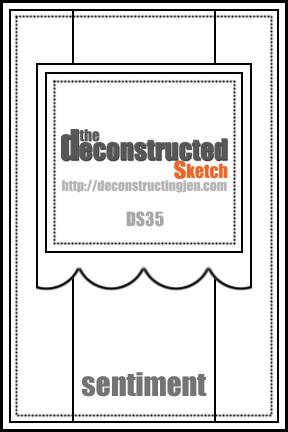
Back again with an entry for this week's Deconstructed Sketch. I have wanted to join in with this challenge for ages so here goes with my first attempt. Here is the sketch:


and here is my intepretation:

I have used MFT's Pure Innocence Stamp - Being Cute Is What I Do for my image and I have coloured this with Copics and paper pieced her clothes using My Mind's Eye - A Happy Heart designer papers. This has been matted on black cardstock and layered on more Happy Heart papers with black matting. The sentiment is from another Pure Innocence set - Merry Wishes stamped in Cherry Cobbler ink and layered on some black ribbon.

On the inside I punched out my sentiment from Pure Innocence' My Basket of Eggs set stamped in Cherry Cobbler ink and layered this with some Happy Heart paper punched with  my scallop oval punch. A strip of coordinating paper finishes off the inside.

Back soon with more!


Supplies
Stamps: Being Cute Is What I Do, My Basket of Eggs, Presents For You (MFT)
Cardstock: True Black, Stampers Select White (PTI); A Happy Heart DP (My Minds Eye)
Ink: Tuxedo Black (Memento); Cherry Cobbler (SU)
Accessories: Copics; Scallop Oval punch, Oval punch (SU); black ribbon

Thursday, January 19, 2012

Colour Create #88 - Pink, Green & Neutral

Hi!
Slowly getting back into the swing of things - starting work again tomorrow,  which I am really not looking forward to. Don't get me wrong, I LOVE my job, but I have really enjoyed these summer holidays and am sad they are over.  Anyway, today its time for another Colour Create Challenge and #88's challenge is to use Pink, Green & Neutral with the optional extra of adding handmade flowers. Here is Suzie's lovely inspiration photo:

19 January - Challenge 88 - Suzie

We are sponsored this week by Kenny K:

Here is my take on the colours:


For this card I used Stamper's Select White for my base and printed my Kenny K digi - Maddison Attitude onto another layer of white card. I also added my own computer generated sentiment using a new font I found - Digs My Hart from Kevin and Amanda  - love this font! I coloured the image with Copics and also paper pieced some of her using some pretty papers from Cosmo Cricket's DeLovely Collection. Along the bottom I added another strip of matching DeLovely paper and some white lace above the join. For my handmade flowers, I used some pink DMC thread to crochet three small flowers and then sewed them with matching button onto the paper strip.


On the inside I kept in simple by printing out another computer generated sentiment and adding a strip of DeLovely paper along the bottom.

You have a fortnight to enter the challenge, so make sure you check out the Colour Create blog with the rest of the lovely DT's creations.


Supplies
Stamps: Maddison Attitude digi (Kenny K)
Cardstock: Stampers Select White (PTI); DeLovely collection (Cosmo Cricket)
Accessories: pink DMC thread; Hibiscus Burst buttons (PTI); lace (Kaisercraft)

Thursday, January 5, 2012

Colour Create #87 - Red, Cream and Sage Green


Hi there!!
I'm back after a little blogging break - needed some time to recharge the batteries before getting back into the swing of creating again. I hope you all had a lovely Christmas and New Year.

It's Edna's turn to post this fortnight's Colour Create Challenge #87 - Red, Cream and Sage. What gorgeous colours!! Here is her inspiration pic for you:

5 January - Challenge 87 - Edna - cream, sage, red

This week's challenge is being sponsored by:


and the winner will receive a $5 voucher to spend in store.


For my card I decided to use Rustic Cream for my base and then some gorgeous paper from October Afternoon's Thrift Shop collection with Real Red cardstock added to the bottom section. I tied some twill ribbon around the join and then added a Pure Poppy flower button threaded with twine.
The sentiment is from Birthday Balloon Jolinne stamped in Rustic Cream ink and heat embossed with clear powder. It's a bit smudgy looking as I dropped the ink pad right on this section and did my best to clean it all away!
My image is from AnnaBelle stamps - Lil Molly's Flowers, coloured with Copics and paper pieced with more Thrift Shop paper and some sage cardstock. She was then cut out with my oval nesties and framed with my scallop oval nesties. Finally she was adhered to the card with foam dimensional tape.

My card was so late (I didn't check the date and though we had another week before the challenge started!) so the inside hasn't been done on this card yet.

I am entering this card into Ribbon Carousel Challenge's RCC34 - Anything Goes as well:


Hop on over to the Colour Create blog to have a look - the ladies are back with some lovely creations!

Supplies
Stamps: Lil Molly's Flowers (AnnaBelle Stamps); Birthday Balloon Jolinne (MFT)
Cardstock: Rustic Cream (PTI); Real Red, Sage Shadow (SU); Thrift Shop Collection DP (October Afternoon)
Ink: Tuxedo Black (Memento); Rustic Cream (PTI)
Accessories: Copics; Scallop Oval nestabilities, Oval nestabilities (Spellbinders); twill ribbon, clear embossing powder; cream twine (SU); Pure Poppy button (PTI); foam dimensional tape

Thursday, December 22, 2011

Card No.6

Back with Card No. 6. I am entering this card in the December Sir Stampalot Challenge which is to use the bingo card below and choose three squares in a row and use that formula on your creation:


I chose to go with the bottom row and use ribbon, a tag and a punch on my card:


I used my corner punch to round the corners of my base and main layer. I then used a negative circle die cut to act as a reverse mask on my card front and used a tiny flower from Beautiful Blooms II to repeatedly stamp within the circle with Tempting Turquoise ink. I stamped the umbrella handle from Scattered Showers in Early Espresso ink.  I embossed the bottom of my main layer with my Elegant Bouquet embossing folder and then tied some brown and white twine above the join. This was then threaded through a die cut tag that was stamped with my Celebrate sentiment using Early Espresso ink before threading through a pink button. The main umbrella image was stamped in Melon Mambo on some spotted pink card and hand cut before being adhered with dimensionals above the umbrella handle.


I rounded the corners of my inside layer with my corner punch and then embossed the bottom again with my Elegant Bouquet folder. A thin strip of the pink spotted card was adhered above this and the sentiment from Scattered Showers was stamped in Early Espresso ink. To finish off the inside, I stamped the small flower randomly around the sentiment in Tempting Turquoise ink.

Okay, I am off to try and get all my presents organised as the big day is approaching too quickly!!


Supplies
Stamps: Scattered Showers, Beautiful Blooms II (PTI)
Cardstock: Stampers Select White (PTI) Pink cardstock
Ink: Tempting Turquoise, Melon Mambo, Early Espresso (SU)
Accessories: Tiny Tags die set (Cuttlebug); Circle nestability (Spellbinders); Elegant Bouquet embossing folder; dimensionals (SU); StrawberryFool button (Elzybells); corner rounder; Cappucino Twine (MFT)

Wednesday, December 21, 2011

Card No. 5

Okay, I am at the half way mark - so here is card no. 5 of my gift set:


This is probably my favourite of the set - it took hours to make, but I love adding all the little details! First I used Pure Poppy card for my base and a layer of Kraft on top. For my main layer I used Rustic Cream cardstock and created my own background with stamps from Papertrey Ink's Round and Round Anniversary set and Beautiful Blooms II. I used Kraft, Old Olive and Real Red ink which I stamped off in each set of three flowers to get some variation in colour. Once I had finished my background I cut a circle out of the centre using my nesties and then cut a frame from Kraft cardstock again using nesties to edge the cut out circle. I cut some more Rustic Cream cardstock and stamped my sentiment from Inside and Out: Birthday in Old Olive ink and then adhered this behind the circle.

I used my scallop border punch to edge a thin strip of Kraft cardstock and adhered this at the bottom of my circle and added some Ripe Avocado ribbon on top. Finally I stamped three flowers from Beautiful Blooms II in Real Red ink, cut them out and then added some sparkle with my Red Atyou Spica glitter pen. These were added to the edge of the frame and the centre one popped up on dimensionals.


For the inside, I created the same background as a border and added a sentiment from Inside and Out: Birthday in Old Olive ink.

See you tomorrow!!!


Supplies
Stamps: Inside and Out: Birthday, Beautiful Blooms II, Round and Round Anniversary set (PTI)
Cardstock: Rustic Cream, Kraft, Pure Poppy (PTI)
Ink: Kraft, Old Olive, Real Red (SU)
Accessories: Ripe Avocado ribbon (PTI); Red Atyou Spica glitter pen; Circle nestabilities (Spellbinders); dimensionals, Scallop border punch (SU)

Tuesday, December 20, 2011

Card No.s 3 and 4


Back again with two more cards from my gift card set for Christmas. The first card uses a very simple black and white colour scheme with lots of embossing:


I used some True Black cardstock for my mat on top of my white base and then another layer of white that was edged with my Apron Lace border. Above the border I added a strip of glitter and then my black spotted ribbon. I stamped the flower stems from Blooming Button Bits and the flowers from Beautiful Blooms II. The sentiment was from Daily Design Sentiments. All the stamping involved using Versamark first, then stamping in Basic Black ink, followed by clear embossing powder.


On the inside I used a flower image from Imaginisce and a sentiment from Inside and Out: Birthday. Both of these were embossed also.
My next card involved a lot of background stamping to create my background paper.


To start with I stamped the dotted Argyle motif from A Little Argyle on my white cardstock with Kraft ink. I then stamped different images from the Basic Grey Blossom stamp set using Certainly Celery, Pumpkin Pie, Old Olive, Pretty In Pink and Melon Mambo ink. Some Hibiscus Burst ribbon was tied around the centre and then this was matted on some Pretty in Pink cardstock and then on to my card base.
I die cut a small circle, then stamped my sentiment from Inside and Out Birthday ink Old Olive ink. This was then matted on a Pretty in Pink die cut using my Blossoms 3 die set. Finally some pink rhinestones were added below the sentiment.


The inside was kept very simple, just stamping another sentiment from Inside and Out: Birthday in Old Olive ink.

So that's it for cards 3 and 4. Back tomorrow with more!!!

Supplies


Stamps: Beautiful Blooms II, Blooming Button Bits, Daily Design Sentiments(PTI); Flower Snag 'em (Imaginisce)
Cardstock: Stampers Select White, True Black (PTI)
Ink: Basic Black (SU); Versamark
Accessories: Apron Lace border punch (Fiskars); Dazzling Diamonds glitter, Clear embossing powder (SU); black polka dot ribbon

Stamps: Inside and Out: Birthday, A Little Argyle (PTI); Blossom (Basic Grey)
Cardstock: StampersSelect White (PTI); Pretty In Pink (SU)
Ink: Pumpkin Pie, Old Olive, Melon Mambo, Pretty in Pink, Certainly Celery, Kraft (SU)
Accessories: Hibiscus Burst ribbon (PTI); pink rhinestones (Kaisercraft); Circle nestabilities, Blossom 3 nestabilities (Spellbinders)

Sunday, December 18, 2011

Card No. 2

Hello!
Back again with my second card in my gift sets. I was going to originally make a set of 10 cards all with the same design, but as usual I have decided to take on a mammoth task and come up with 10 different designs. Oh well, I have made 4 - only 6 to go! Here is card number 2:


This is probably the one that I am least happy with. I used Stampers Select White for my base and some old Kaisercraft paper for the bottom half. I cut some blue ribbon and looped it on either side along the join. To create my focal image, I die cut a circle from white cardstock and also a couple of grey circles. I then cut some hill shapes out of the grey cardstock and held them on my white circle to work out where to position my trees. I had to use my trusty Stamp-a-ma-jig to position the trunks of the trees and then the tree tops, with some light blue pigment ink and some darker blue rolled along the edges. I then straight stitched along the border of the hills. This was then matted on a black border die cut with my dizzy doily die. Finally I die cut a tag, stamped my sentiment and tied it to my doily border with some Twilley's blue thread.


On the inside I used some more of the pattterned paper along the bottom as a border and then stamped my sentiment and decorative motifs either side.

Okay, I will be back soon tomorrow with card no. 3!

Supplies
Stamps: Mat Stack 1 (PTI); Trendy Trees (SU)
Cardstock: Stampers Select White, True Black (PTI); Basic Grey (SU); Miscellaneous DP (Kaisercraft)
Ink: Tuxedo Black (Memento); Cyan pigment ink (Versacolor); dark blue pigment ink (Martha Stewart); Night of Navy (SU)
Accessories: Dizzy Doily die (MFT); Circle nestability (Spellbinders); Tiny tags die (Cuttlebug); blue ribbon (Kaisercraft); Blue Goldfingering yarn (Twilleys)