Friday, April 29, 2011

CSAYL Challenge - Use Your Favourite Holiday Image

Hi again!
I was really looking forward to posting this card as the CSAYL Challenge this week is just to use your fave holiday image on your creation. This stamp set - Charlotte's Holiday Mail from Little Loud Stamps - is without a doubt one of my all time favourites as it is just tooo cute!!! The winner of this week's challenge will have the opportunity to be a guest designer over on the CSAYL blog for one week in May!
I decided to go with a white theme for my card to create a lovely wintery look, so started with Select White cardstock for my base and then stamped my image straight onto my main white panel. I used the snow from the image to stamp extra snow on either side. I coloured my little girl with Copics and then stamped the envelope again and mounted this on dimensionals. With my Quickie glue pen, I added some glitter to the snow, mail box and the edge of the layer.  I die cut some clouds and then heat set them and added glitter to cover them before adhering with dimensionals also.
Along the bottom, I added a row of diamantes and my banner sentiment. Finally, the main panel was adhered to the card front with foam tape - it looks so much better in real life!
On the inside, I die cut another cloud and stamped my sentiment, before edging the cloud with glitter and adhering it to my main layer which had also been edged with glitter.

Take a look at the cards on the CSAYL blog as their are some fantastic creations and why not have a go at creating a card for this challenge - I am starting to collect quite a stash of Christmas cards so I won't have any last minute rush this year!!
Supplies
Stamps: Charlotte's Holiday Mail - Christmas Freckle Collection (Little Loud Stamps); Wings of Joy (TE)
Cardstock: Stampers Select White (PTI)
Ink: Tuxedo Black (Memento); Crumb Cake (SU)
Accessories: copics; Dazzling Diamonds glitter (SU); diamantes; cloud die (PTI); dimensionals; foam tape; Quickie glue pen

AnnaBelle Bling Sketch Challenge ABSC037

Hi,
I hope everyone is getting back into the swing of things after our unusual Easter/Anzac break this week. It feels weird for me to back at school and the first week of term is nearly over already!! This term is going to be so much better than last term, I can tell already!!! Anyway, its that time of the month again - time for the next monthly AnnaBelle Bling Sketch Challenge over at the AnnaBelle Stamps blog:
absc037


For this challenge, I decided to use the AnnaBelle Stamps Mother's Day Bouquet set for my main image which I coloured in with Copics and then added a little Glossy Accents to the tulips (sorry my image is a little blurry).
I added a Christina Re circle frame which seemed perfect for  my image and then stamped the tulips a second time and adhered with dimensionals, slightly overlapping the border and then I added some Blossom Sprinkles for my bling. The rectangular section beside my image was stamped with one of the small images from Backgrounds By Design 1 in Blush Blossom ink on Pink Pirouhette cardstock. I then stamped the sentiment in Versafine Vintage Sepia ink and added some white cross stitches below. Both this section and the circle were raised up on foam tape to add some pop. I created my diagonal grid pattern for my background by scoring at 1 inch intervals on Certainly Celery card and then lightly using a sanding block to add some texture. Some Hibiscus Burst ribbon finished off the front of the card.
On the inside of the card I stamped the same small background image across the top in Blush Blossom ink and another sentiment from Mother's Day Bouquest in Vintage Sepia ink.

Make sure you head on over to the AnnaBelle Stamps blog to find out how you can go in the draw to win a gift voucher to the AnnaBelle Stamps store and also check out the lovely designs from the team as well!


SuppliesStamps: Mother's Day Bouquet, Backgrounds By Design 1 (AnnaBelle Stamps)
Cardstock: Pink Pirouhette, Certainly Celery, Whisper White (SU); Brown cardstock - soon to be released (AnnaBelle Stamps)
Ink: Vintage Sepia (Versafine); Blush Blossom (SU)

Accessories: 6mm Blossom Sprinkles (AnnaBelle Stamps); lace circle border (Cristina Re); Hibiscus Burst dotted ribbon (PTI), paper piercer; white thread; dimensionals, foam tape

Monday, April 25, 2011

A Pop Of Colour

Hi,
I am starting to find that I am really leaning more towards making clean and simple cards - every now and then I love to go a little vintage or add some lovely paper from my ever growing stash - but clean and simple just seems to be more my style. A little while ago I made a card with one of my Pure Innocence stamp sets here and I thought it would be fun to do the same with two more sets, adding just a pop of colour. The first set that I used was Being Cute Is What I Do and I chose to use Baja Breeze as my pop of colour:
I stamped my image in Tuxedo Black ink and lightly added shading with my C1 and C5 markers. I coloured her flower and hair ties with my BG72 marker and added some small flowers from AnnaBelle stamps Backgrounds By Design 1 set stamped in Baja Breeze ink. The cardstock used was Very Vanilla, Kraft and Baja Breeze. I used MFT's Banner Strip Die and Mini Alphabet set to stamp Happy and the Birthday sentiment is from PTI's Birthday Basics set. The inside uses a sentiment from Inside and Out Birthday and the same flower image.

For the second card I used Pure Innocence Love You With All My Heart with Kraft, Very Vanilla and Real Red.
Again, I stamped the image with Tuxedo Black ink and shaded with my C1 and C5 markers. I coloured the hair clip and heart with a Real Red Stampin Up marker and then stamped some random hearts around her feet with Real red ink. I layered some more hearts over the top that had been hand cut. The sentiment is from Daily Design Sentiments. The inside uses another sentiment from Inside and Out Birthday and some more hearts.

Supplies
Stamps: PI: Love You With All My Heart, PI: Being Cute Is What I Do, Mini Alphabet (MFT); Birthday Basics, Inside and Out: Birthday, Daily Design Sentiments (PTI); Backgrounds By Design 1 (AnnaBelle Stamps)
Cardstock: Kraft, Very Vanilla, Baja Breeze, Real Red (SU)
Ink: Real Red, Baja Breeze (SU); Tuxedo Black (Memento)
Accessories: Banner Strip Die (MFT); Real Red marker (SU); Copic Markers - C1,C5,BG72

Friday, April 22, 2011

CSAYL challenge - Warm and Fuzzy

Hi,
Time for another CSAYL challenge and this week the sponsor is A Perfect Presentation:

View Perfect P...bmp in slide show
..and the challenge is to use felt on your creation. The winner of this week's challenge will receive a template of their choice.
I have used the Easy Candy Wrap template this week and I printed it out onto some white cardstock.  I then cut another piece of white cardstock to wrap around the centre of the box and stamped some Baja Breeze snowflakes randomly on all sides. I then used the To/From sentiment from A Rhonna Christmas set in Night of Navy ink. I used some Ocean Tides felt for my two borders and created this by using the scallop piece from MFT's Banner Die set a few times and adhering on all four sides. (I need to build up my die collection!).
 I then stamped the Christmas tree also from the Rhonna Christmas set in Old Olive ink, hand cut it, mounted it on dimensionals and covered it in Glossy Accents. To finish off the tree I added some Chilli Sprinkles from AnnaBelle Stamps.  I then punched out some tiny snowflakes and adhered them with glue dots all over the main section of the candy wrap. Finally I tied some Cranberry seam binding from My Craft Spot around each end.

I can definately see I wll be making a lot more of these Easy Candy Wraps and think they would be a perfect addition to the dinner table on Christmas day instead of the traditional bonbons. Make sure you pop over to the CSAYL blog and enter your creation for your chance to win a fabulous template as well as being inspired by the DT's wonderful work!!

Thank for visiting!!


Supplies
Stamps: Wings of Joy (TE); A Rhonna Christmas (Autumn Leaves)
Cardstock: Select White (PTI)
Ink: Baja Breeze, Old Olive, Night Of Navy (SU)
Accessories: Easy Candy Wrap template (A Perfect Presentation) dimensionals (SU); Glossy Accents (Ranger); Chilli Sprinkles (AnnaBelle Stamps); Cranberry scrunched seam binding (My Craft Spot); Ocean Tides felt (PTI); Banner Die (MFT); small snowflake punch

Thursday, April 21, 2011

Colour Create Challenge #69 - Pink, Brown and Blue

Hi,
I hope everyone has had a lovely week leading up to Easter. I went camping for 5 days and it poured with rain for 4 of those days!! Still, it was great to get away and the kids had so much fun.

Today it is time for another Colour Create Challenge and this time the colours are pink, brown and blue with the optional extra of acetate or cracked glass technique. I have just purchased some clear cardstock, so I decided to go with that.
My card has a base of Aqua Mist which I scored along both the bottom and top and then die cut a circle window in the centre. I used Versamark and a lovely flower image from Imaginisce's Baby Powder collection to break up the plain cardstock and stamped my sentiment in Vintage Sepia ink using a sentiment from MFT's My Basket of Eggs set. The base and the sentiment were lightly inked with my Chamomile Tea Dye ink  and then a crochet flower was added with a Sweet Blush button.

I stamped my girl from the same MFT set in Tuxedo Black ink and coloured her with my copics and then paper pieced her dress and basket with some retired Stampin' Up paper. I die cut her and some clear cardstock with a larger circle die and then adhered them to the inside of the front of the card. I finished off the front by tying some chocolate striped baker's twine around the top between the score lines.
On the inside of the card I stamped the Happy Easter sentiment in Vintage Sepia ink and then added some more flowers that were stamped in Crumb Cake ink, stamped off once first. This was then die cut and adhered to the same designer paper.

There are some fantastic designs from the rest of the DT, many using the cracked glass technique, so be sure to pop on over to the Colour Create blog to have a look!

Back soon,


Supplies
Stamps: My Basket of Eggs (MFT); flower image - Baby Powder collection (Imaginisce)
Cardstock: Aqua Mist, Stampers Select White; Clear Cardstock (PTI); Retired DP (SU)
Ink: Tuxedo Black (Memento); Versamark; Vintage Sepia (Versafine); Crumb Cake (SU); Chamomile Tea Dye (PTI); handmade crochet flower
Accessories: Sweet Blush button (PTI); circle nestabilities (Spellbinders); chocolate striped bakers twine (MFT)

Friday, April 15, 2011

CSAYL - Put That Marker Down!!

Hello!!
I am officially on holidays for 11 days!!! I can't believe the term is finally over and I can relax and spend some time with my family without all the running around here, there and everywhere!! So the first challenge of my holidays is the CSAYL weekly challenge and this week its to put those markers down and watercolour your image instead.
This week's fabulous sponsor is In Style Stamps and the winner will be able to choose 4 digis of their choice.
I used Christmas Tree Chloe and watercoloured her on Stampin' Up watercolour paper. I then cut her out and popped her up on dimensionals on my die cut circle. I found some matching red fabric, so cut a square with my pinking shears and then machine stitched this to some Kraft cardstock. The patterned paper is from Kaisercraft's Christmas Carnival collection and this was sewn onto the red mat with linen thread, before adhering to the Kraft base. I used Pretty In Pink ribbon to cover the join and attached my tag to the bow with a spiral paperclip. The sentiment is from MFT's Presents For You set. I also added Dazzling Diamonds glitter to the santa hat and suit.
On the inside the presents and sentiment were used from MFT Presents For You set and a strip of Christmas Carnival paper and a strip of Pretty In Pink card were added down the side.
The rest of the design team has some wonderful creations, so take a look over at the CSAYL blog and be sure to enter for your chance to win. 
Supplies
Stamps: Christmas Tree Chloe Digi (In Style Stamps); Presents For You (MFT)
Cardstock: Kraft, Real Red, Pretty In Pink, Whisper White, watercolour paper (SU); Christmas Carnival DP (Kaisercraft)
Ink: Tuxedo Black(Memento); Real Red, Crumb Cake, Certainly Celery, Pink Pirouhette, Baja Breeze (SU)
Accessories: Pretty In Pink ribbon, dimensionals, Dazzling Diamonds glitter, aquapainter (SU); circle nestability (Spellbinders); Swiss Dots embossing folder; Tiny Tags die set (Cuttlebug); spiral paper clip; linen thread; red fabric, pinking shears

Say It In.... Purple and Blue!

Say_It_In_purple_blue


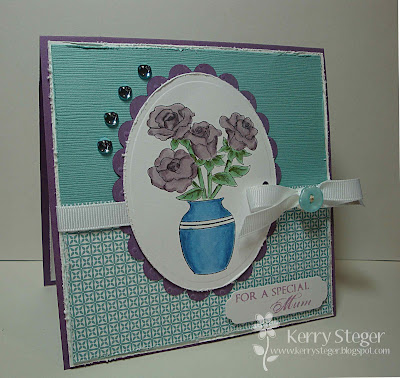
It's time for another weekly challenge from AnnaBelle Stamps and this week the colours to use are purple and blue with cream. Now I made mine with white as my neutral and it was too late when I realised it should have been cream instead. I used a new set from AnnaBelle Stamps called Mothers Day Bouquet and I LOVE this set!! Its great for mixing and matching images and for those who love to colour, this set will be perfect! * I have to apologise for my terrible photos - I was rushing to get out the door for work, so I had no time to get my photos clearer - frustrating!*
I used Plum Pudding cardstock for my base and then matted some new blue cardstock (soon to be release at AnnaBelle Stamps)on some white. On the bottom half of my card I also added some Baja Breeze Designer Paper to add some more interest. The vase and roses were stamped in Tuxedo Black ink and then I used my copics to colour them in. The image was die cut into an oval with my nesties and I matted the image on a scallop oval in Plum Pudding card.  I used my slot punch to punch a hole to feed the ribbon through and then distressed all the edges . The sentiment is also from the Mothers Day Bouquet set and it was stamped in Plum Pudding ink. Before assembling, I added some Waterfall Sprinkles and tied a blue button onto my bow.
On the inside I stamped the sentiment in Plum Pudding ink and then matted this onto some more Baja Breeze designer paper. In either corner, I stamped the rose image, finishing it off with copics.

Be sure to pop on over to the AnnaBelle Stamps blog to check out the other designers' cards and also find out about how you could win a gift voucher to spend in the AnnaBelle Stamps store.

Supplies
Stamps: Mothers Day Bouquet (AnnaBelle Stamps)
Cardstock: Whisper White, Baja Breeze DP (SU); Plum Pudding (PTI); blue cardstock - soon to be released (AnnaBelle Stamps)
Ink: Tuxedo Black (Memento); Plum Pudding (PTI)
Accessories: oval, scalloped oval dies (Spellbinder); white ribbon; corner rounder; Copic markers; blue button, 6mm waterfall sprinkles (AnnaBelle Stamps); distressing tool (Tim Holtz)

Wednesday, April 13, 2011

Another Clean and Simple Card

I just bought a new stamp set by Kaisercraft called Utopia and had been itching to use it, so when I saw Heather's Totally Hues Challenge #5, I thought this set would be perfect. The card that I am showing on this post though is my second attempt as my first one looked awful and I had so much trouble balancing these colours - I couldn't get the pink and green next to each other to work, so I decided to only use the New Leaf as an accent so it didn't overpower everything. Here are Heather's challenge colours this fortnight:
 
This is such a fun set to use and great for those who love to colour in. On my Kraft base, I stamped my flower image in Tuxedo Black and coloured them in with R59, R22 and R20 Copics. I then stamped two more, coloured them in and popped them up on dimensionals on two of the flowers. My image from Inside and Out Birthday  was stamped in Scarlet Jewel ink and then a border was added of Scarlet Jewel cardstock cut with my Upper Crest border punch, some Scarlet Jewel ribbon and some Dotty Biscotti paper in New Leaf. Finally I added three Sweet Blush buttons which had been sewn with linen thread, some Dazzling Diamonds glitter to the inner section of my flowers and Glossy Accents to add some shine to the centres.
For the inside I used a layer of Dotti Biscotti New Leaf paper and then some Kraft cardstock. The flowers were randomly stamped with the same flower image in Versamark ink and the sentiment was stamped in Scarlet Jewel ink.

There you have it - my first card for the week, but there are a couple more to come and I have to get busy as my family is going to the coast camping on Saturday for a week! Boy am I glad its school holidays here in Qld next week - it has been such a long 12 week term for the children I work with and my own kids (and me!) are feeling it too!

On the up side though - I have finally taken the plunge and bought my first ever SLR camera and now I have to figure out how to use it!!

Back soon, 

Supplies
Stamps: Utopia (Kaisercraft); Inside and Out: Birthday (PTI)
Cardstock: Kraft, Scarlet Jewel, Dotti Biscotti paper (PTI)
Ink: Versamark; Tuxedo Black (Memento); Scarlet Jewel (PTI)
Accessories: Scarlet Jewel ribbon, Sweet Blush buttons (PTI); Dazzling Diamonds glitter, dimensionals (SU); Glossy Accents (Ranger); Upper Crest border punch (Kaisercraft); linen thread

Friday, April 8, 2011

CSAYL Challenge - Cut It Out!


Back again!!
This week's challenge over at the CSAYL blog is to Cut It Out - so use any stamp you like, but use the technique of paper piecing somewhere on your card. The prize for this week's challenge?? MacKenzie will pick one winner who will be chosen as a guest designer for one of the challenges in May!
I have chosen to use is CC Designs Santa Emma stamp and a coordinating bench image.
There are a lot of steps involved so I will list them as briefly as possible below for those who would like to know how I put this together:
1. Make base from Vintage Cream card and round bottom edges.
2. Stamp Emma and then mask and stamp the bench seat over the top. Colour with Copics.
3. Stamp Emma again onto grey cardstock and patterned paper. Cut out and adhere for her clothes.
4. Stamp snowflake image randomly in Bashful Blue ink and sprinkle glitter to centres using Quickie Glue pen as adhesive.
5. Add Quickie Glue pen to santa hat and sprinkle glitter over the top.
6. Cut two different strips of Designer Paper and one strip of Bashful Blue card, punching the bottom of one paper strip with scallop punch and adhere them underneath image.
7. Stamp sentiment on blue strip in Melon Mambo ink and wrap bakers twine around, tying in small knot.
8. Punch out large snowflake image and use heat and stick powder to adhere glitter. Thread more bakers twine through a button, tie in bow and adhere with glossy accents to snowflake. Adhere snowflake to card with Scor-Tape.
On the inside:
1. Adhere cream cardstock behind front of card to hide where Copics have shown through cardstock.
2. Cut another piece of cream cardstock with bottom corners rounded and adhere where message will go.
3. Cut two strips of Designer Paper, border punching one with scallop punch and adhere to cream layer.
4. Stamp sentiment in Melon Mambo ink.
5. Stamp snowflakes down the side with Bashful Blue ink.

Why not hop on over to the CSAYL blog, check out the other designers' creations and link yours too before midnight next Thursday for your chance to be a guest designer!

Thanks for looking,

Supplies
Stamps: Santa Emma, Sugar Plums Bench  (CC Designs); Wings of Joy (TE)
Cardstock: Vintage Cream (PTI), Bashful Blue, Retired Rose Red DP (SU); Designer Paper (Kaisercraft)
Ink: Tuxedo Black (Memento); Melon Mambo, Bashful Blue, Versamark (SU)
Accessories: Heat and Stick Powder, Dazzling Diamonds glitter, Scallop border punch (SU); Copics; Snowflake Punch (Marvy); Bakers Twine (MFT); Hibiscus Burst button (PTI); Quickie Glue Pen (Sakura); Glossy Accents (Ranger); Scor-Tape

Say It With.... A Banner!


Hello,
Over at the AnnaBelle Stamps blog this week, the challenge is to say it with... A Banner!
Say_It_With_a_banner
As soon as I saw this challenge I thought I would go for the standard pennant style banner, but after die cutting and trying different ideas with my pennants, it just did not want to work for me, so I started all over again with a standard sentiment banner, using one of my favourite AnnaBelle Stamps - Ballerina Rose.
I cut a layer of cream cardstock and ran this through my Cuttlebug with my Canvas impression plate. I then stamped some small flowers from the Backgrounds By Design 1 set in Versamark on Sweet Blush cardstock and clear embossed them, colouring the petals in with a clear spica glitter pen. Once this was complete, I adhered the Sweet Blush card to my cream layer and then added a thin layer of glitter around the edge with  my Quickie Glue Pen. Some Chocolate Chip ribbon was wrapped around the middle and then the layers were matted on some Chocolate Chip cardstock before adhering to my Sweet Blush base.

I stamped 6 of the medium flowers from Ballerina Rose in Vintage Sepia ink and coloured them in with R81,R83 and R85 copics, adding some E59 to the centres. These were then fussy cut and dipped in glitter along the edges. The leaves were also handcut from the large flower stem image and then the flowers and leaves were assembled along the Chocolate Chip ribbon, with a couple popped up on dimensionals. The sentiment from Ballerina Rose was stamped in Vintage Sepia and then cut into a banner and inked with some Chamomile ink before adhering.
On the inside I used the same stemmed flower image, this time stamping in Blushing Bride ink and colouring with the same Copic markers. I used my Pretty In Pink marker to go over the flower edges to give some more definition and then added glitter to the flower centres. The sentiment was stamped in Vintage Sepia ink.
The other designers' creations are wonderful, so be sure to check them out: 

How To Play Along : 
- We post our challenges every Friday at 12:00pm AEST (AEDT during Daylight Savings).
- Our Sketch Challenge Runs from the last Friday of a month through till the last Friday of the following month.
- Each Friday in between we have themed challenges. To be eligible for the monthly prize of a $20 gift voucher to spend in store at AnnaBelle Stamps you MUST take part in the sketch challenge AND one of the weekly challenges.
- Please link directly to your entry not just to your blog.
- Include a link back to The AnnaBelle Stamps blog in your post.
- Please don't link to postings made prior to the date of our current challenge.  All projects submitted must be new.
- A maximum of 5 challenges may be combined including this one.        
- You may enter any challenge several times as long as each submission is with a new creation.
- We would love you to use AnnaBelle Stamps, but you can play along without them. For those who use AnnaBelle stamps and upload to the Gallery HERE then you will also be in the running to be our Monthly Guest Designer!

Thanks for visiting!
Kerry
Supplies
Stamps: Backgrounds By Design 1, Ballerina Rose (AnnaBelle Stamps)
Cardstock: Chocolate Chip, Very Vanilla (SU); Sweet Blush (PTI)
Ink: Versamark; Vintage Sepia (Versafine); Blushing Bride (SU); Chamomile Tea Dye ink (PTI)
Accessories: Clear embossing powder, Dazzling Diamonds glitter, Pretty In Pink marker, Chocolate Chip ribbon (SU); Linen/Canvas impression plate (PTI); Copic Markers; Atyou Clear Spica glitter pen

Thursday, April 7, 2011

Colour Create Challenge #68 Black, Pink and White

Hello, I am back with this Colour Create's fortnightly challenge and this week the challenge is to use pink, black & white with the optional extra - tulle. Here is the inspirational pic:
7 April - Challenge 68 - Julie
The sponsor for this week is Michelle's Scrapbooking.
MONTHLY SPONSOR
I have to admit that I found this card a lot more challenging than I first thought it would be. Pink and black are a favourite colour scheme of mine, but I just had trouble converting the idea in my head onto paper and the photos don't show the colours at their best either. Anyway here is my card:
I have been itching to ink up my Up,Up and Away set for weeks now and decided this would be the perfect challenge as I wanted to use them on acetate. So for my card base I used some Clearly Creative Cardstock from Papertrey ink and I used some designer paper along the bottom of my card front.  I wrapped some lace around the join and threaded it through a Sweet Blush button, adding my tag with sentiment.  I stamped the base of the three balloons directly onto my acetate with Stazon Jet Black ink and pierced a hole either side of the basket tops, threading through some pink bakers twine. My three balloons were stamped in Versamark, then Tuxedo black ink and finally clear embossed. I popped them up on dimensionals to give a little pop.
The inside of the card was kept very simple by adding some designer paper under my sentiment and mounting this on Sweet Blush cardstock. To hide the back of the balloons and designer paper, I simply stamped three more balloons and adhered them on the inside to cover the dimensionals. I also did the same with the designer paper. Unfortunately I didn't have any tulle, so I had to opt for lace instead, but make sure you check the other designers' creations out as they have done an awesome jobadding their tulle. Remember to link your card to the blog to be in the running to win this week's prize. All the details are over at the Colour Create blog.

Supplies
Stamps: Up, Up and Away (PTI)
Cardstock: Clearly Creative Cardstock, Sweet Blush, Stampers Select White (PTI); Tie The Knot DP (Bella)
Ink: Jet Black (Stazon); Tuxedo Black (Memento) Blushing Bride (SU); Versamark
Accessories: dimensionals, clear embossing powder (SU); lace (Kaisercraft); Sweet Blush button (PTI); Tiny Tags die set (Cuttlebug); pink striped bakers twine (MFT)

Sunday, April 3, 2011

Colour Q Challenge #78

Hello,
I hope you have had a lovely weekend so far - I have! I have had sooooo much stamping time and finished quite a few projects, so I feel that I have accomplished a lot! I decided that I would have a go at entering a card in Colour Q's Challenge #78 and here are the colours to work with:

I have all the colours required except for Early Espresso, so I had to pick the next closest colour for me which was Chocolate Chip. I have had the cutest digi image - Daffodil Fun - that I have wanted to ink up that my fellow Colour Create Design Team Member Di has created. You can visit her online store here - you should check it out - she has some gorgeous images!

I used Chocolate Chip for my base and then a layer of white which I ran through my Cuttlebug with my Linen Impression Plate. I then added some Green Tea Leaves Designer Paper to the bottom half to break up all the white and tied some Pink Pirouhette ribbon along the join. My image was printed on white cardstock and then coloured with Copics (not my best colouring on the bear). Once I had finished, I also ran this layer through the Cuttlebug with my Linen Impression Plate. I found an old reliable stamp set in my collection - Short and Sweet and thought this sentiment suited this whimsical image, so I stamped this in Kraft ink. I finished off this panel by paper piercing along the bottom. This layer was then matted on Kraft cardstock with some punched Certainly Celery card along the bottom and popped up on dimensionals.

The sentiment on the inside was again stamped in Kraft ink on white card and a border added along the bottom with  my Green Tea Leaves paper and Certainly Celery punched card.

Off to go and collect my kids - my sister in law has taken them out to the museum and science centre for the day, so I had better rescue her as they were so excited and I am sure she will be worn out!!

Supplies
Stamps: Daffodil Fun Digi (Di's Digi Downloads); Short and Sweet, Best Yet (SU)
Cardstock: Chocolate Chip, Whisper White, Certainly Celery, Kraft/Crumb Cake (SU) Green Tea Leaves DP (PTI)
Ink: Kraft (SU)
Accessories: Linen impression plate (PTI); Pink Pirouhette ribbon, dimensionals (SU); Copics; Upper Crest border punch (Fiskars); paper piercer; green rhinestones (Kaisercraft)